FMOD is an audio middleware designed for the implementation of adaptive music and complex audio tasks. FMOD makes it easy to implement Blips music packs into your game which will enable you to have a professional sounding soundtrack in no time.
This tutorial is divided in three parts. In this first part we'll cover the implementation of a Blips "vertical layers" music track with layer switching. The second part will explain how to seamlessly transition between multiple tracks when using a bigger music pack such as the Blips "Pack M" or "Pack L". The third and final part will explain how to control FMOD through code using the Unity game engine and the C# programming language.
Note: You don't need to follow this tutorial step by step if all you want to do is to implement a Blips music pack as quickly and easily as possible using FMOD. You can download the complete project you'll end up with at the end of this tutorial from our GitHub account.
An advanced template based on this project is also available for free. The template features placeholders for three music tracks (Blips Pack L), seamless win and lose cue switching and an effect based on the player's health. This template was created by our in-house composer Helder "XtuK" Santos. You can download it on Helder's website.
If you want to learn more about how I've created this FMOD project or about adaptive music implementation using FMOD, keep reading.
In this tutorial you'll learn to implement a track built in layers, and exposing the control of these layers to your game code. Blips has three music pack sizes, depending on the one you have chosen you'll be presented with one to three multi-layered music tracks.
For this tutorial I'll be using a Blips “Pack M”, which consists of two multi-layered tracks with four layers each. Don't have a Blips music pack yet? No problem! You can follow along with a free "Pack M" courtesy of Blips composer Peter Roberts! This pack has exactly the same license as any other Blips Pack M, which means you can use it in both non-profit or commercial projects. All you need to do is to register for a Blips.fm account and download the music pack.
If you don't have FMOD installed yet, you may find this article useful.
The FMOD version used to write this tutorial was the 2.02.11. If you end up having a compatibility problem with newer versions let us know so we can update this tutorial or release a new one!
With FMOD installed and ready to go on your system, follow these steps:
- Open FMOD Studio.
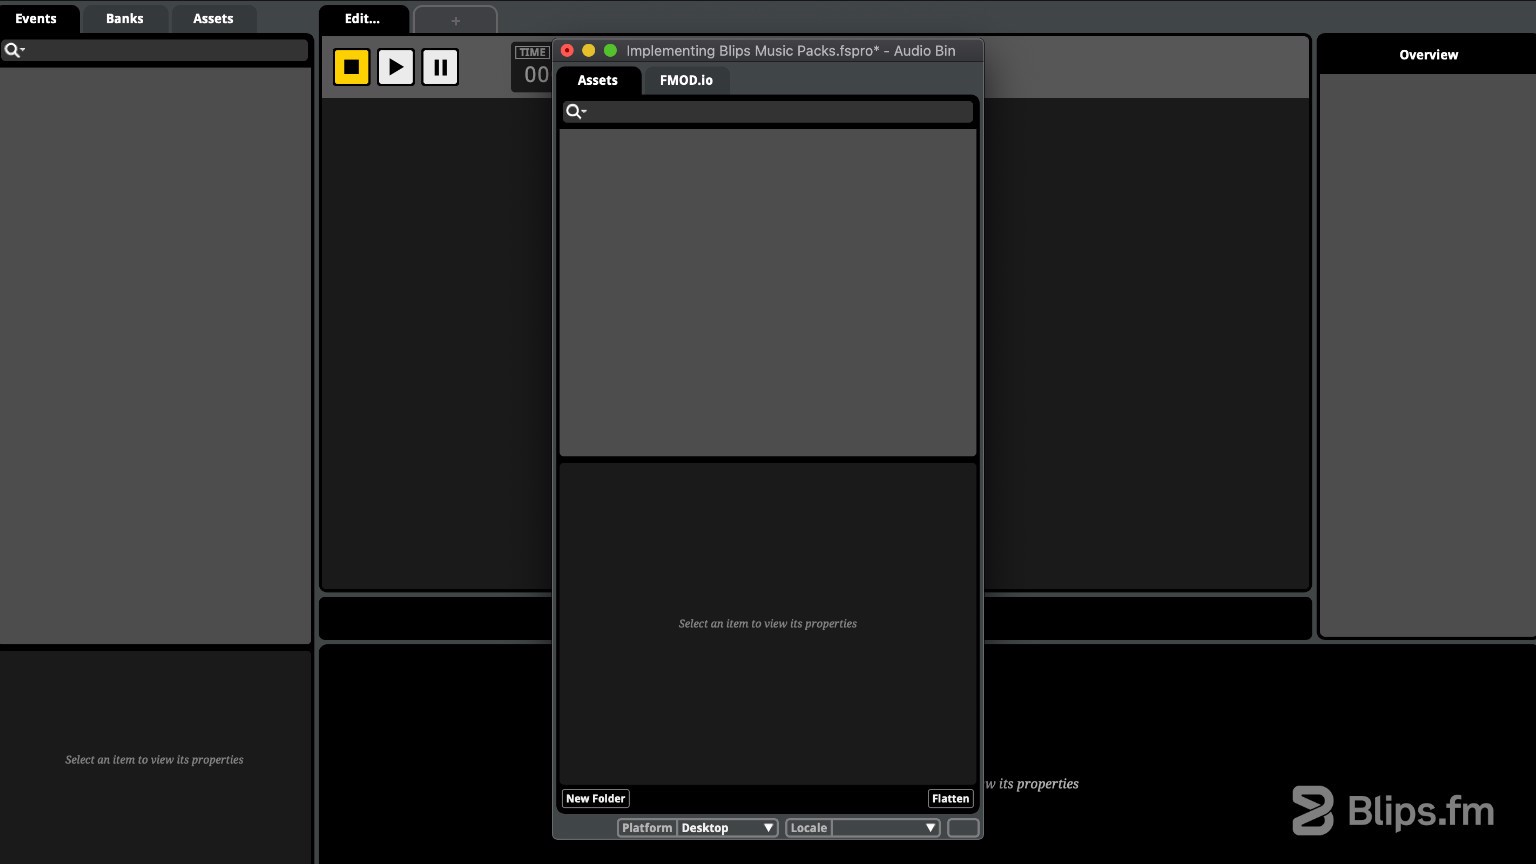
- Under “Window” on the top menu, select “Audio Bin.”

- Drag all the pack files here (Assets tab), if you've selected the Win and Lose tracks, add them here as well.
- Under the events tab on the main window's left pane (Browser), right click to create a new event, choose "Event Defaults" > 2D Timeline.
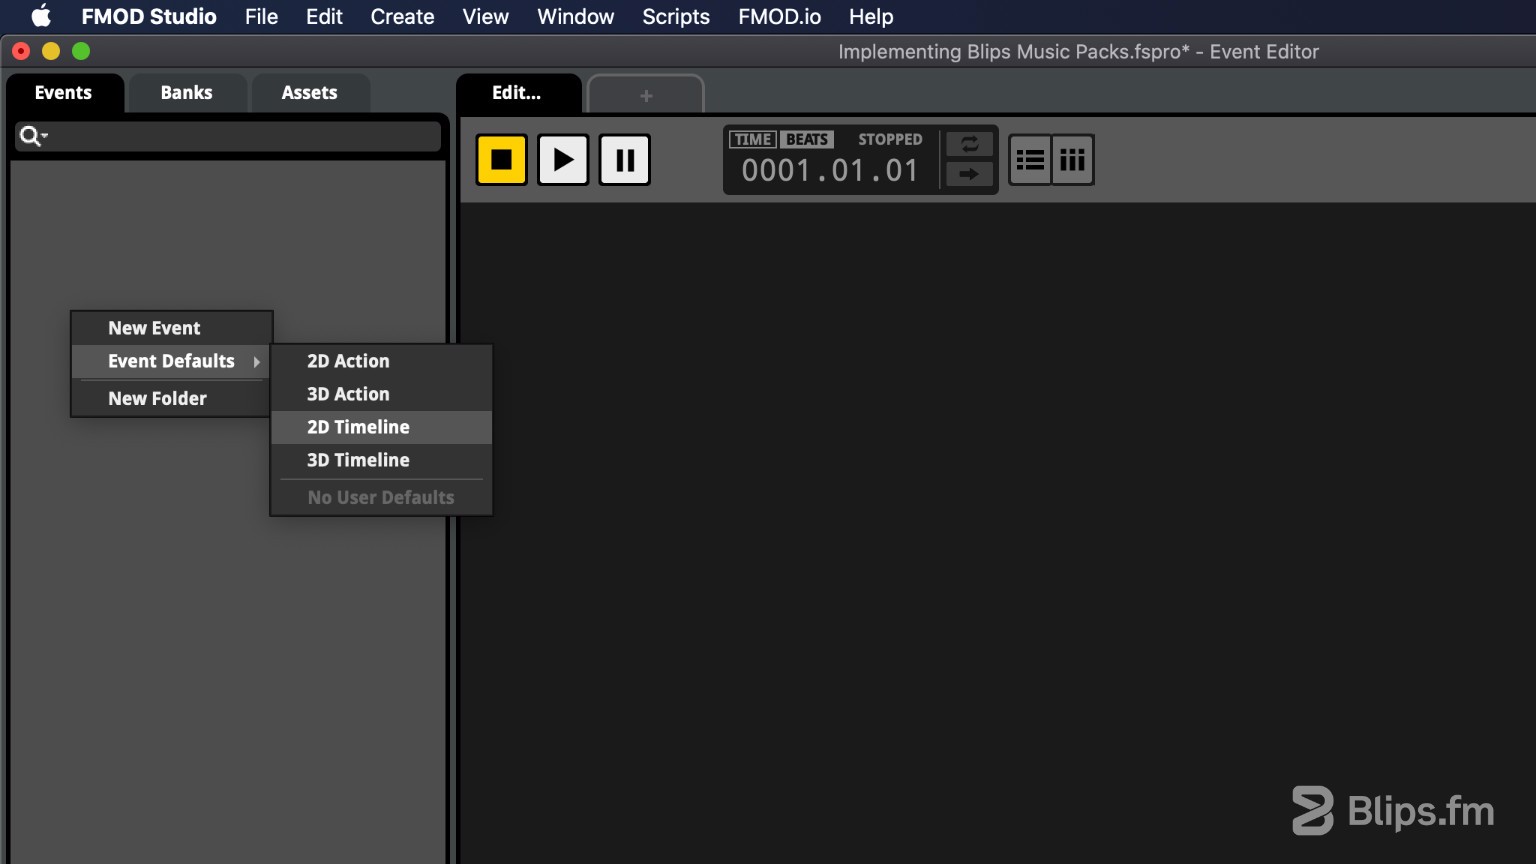
- Give a name to the newly created event such as “Music.”
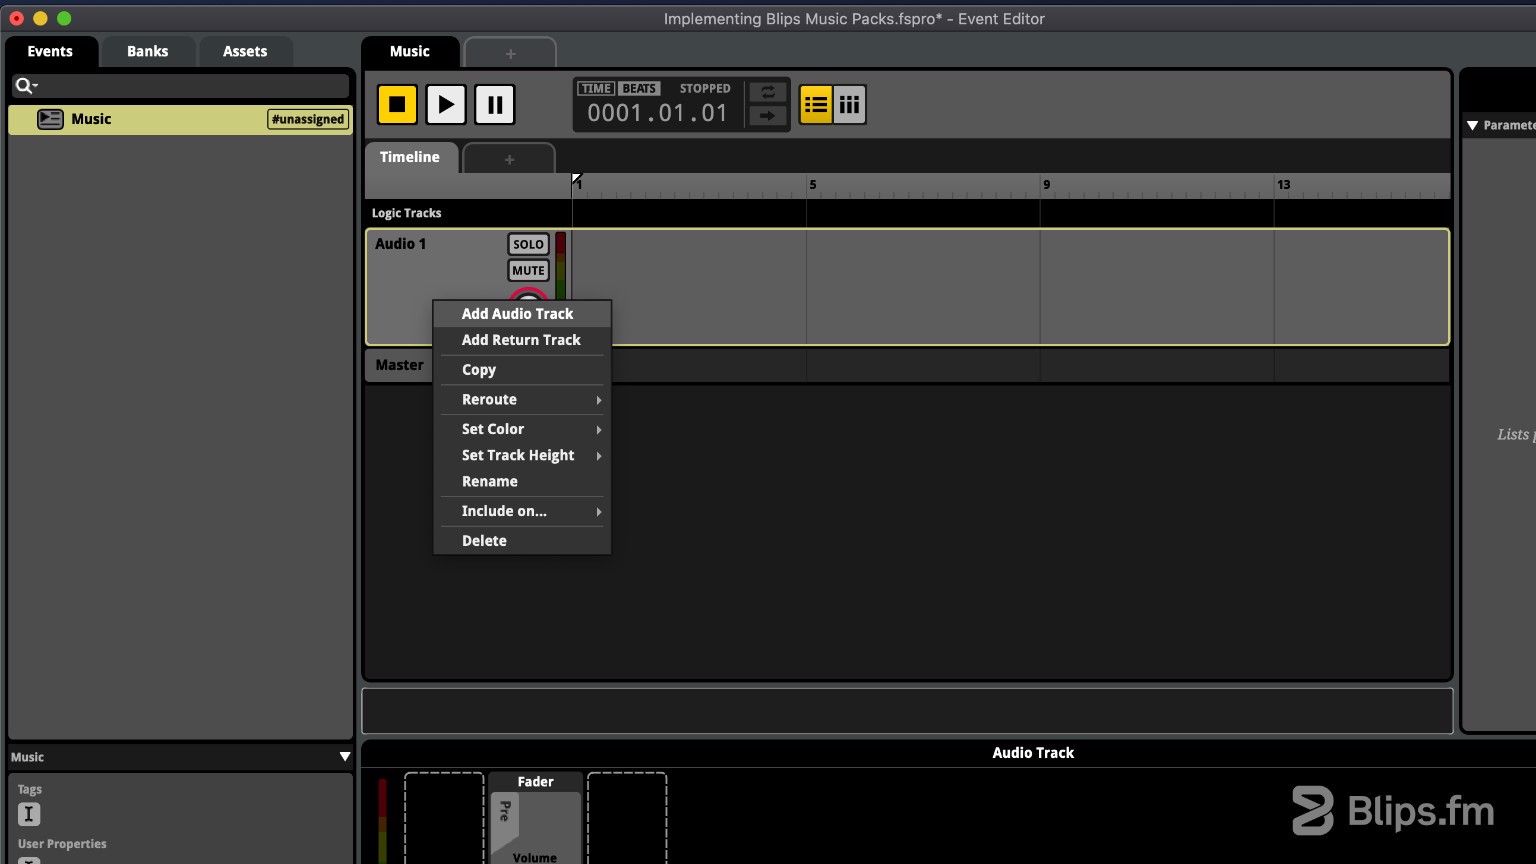
- To the right of the Browser, you'll now see that an audio track has already been created for you. Depending on the size of the pack you downloaded you'll need to create additional audio tracks. Because I'm using "Pack M" (two tracks with four layers each), I'll need to create three additional audio tracks for a total of four. These tracks will be used to accommodate the track's layers. Right click on the track named “Audio 1” and select “Add Audio Track.” Repeat this step until you have the number of tracks that match the number of your track's layers.
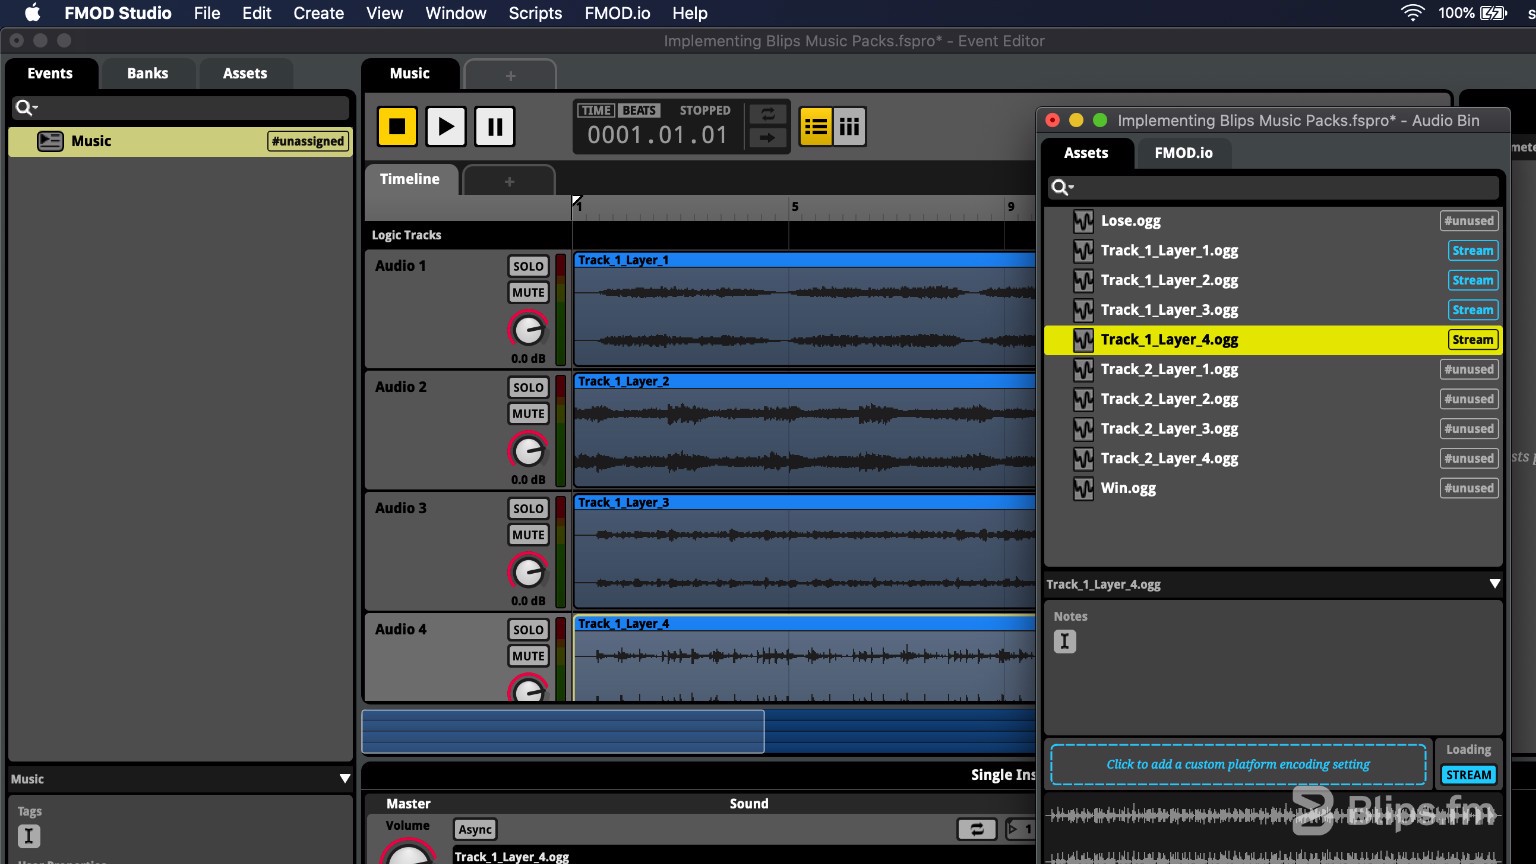
- Go to the “Audio Bin” window and drag the numbered layers of your first track to the corresponding audio track numbers. Ex: “Track_1_Layer_1” to “Audio 1”, “Track_1_Layer_2” to “Audio 2”, etc. Close the “Audio Bin” window and move the dragged layers to the same start position (Note: be careful to not resize them). I'll move them totally to the left on the timeline (measure 1).
- You'll now be able to preview the full track playing by pressing play (space bar).
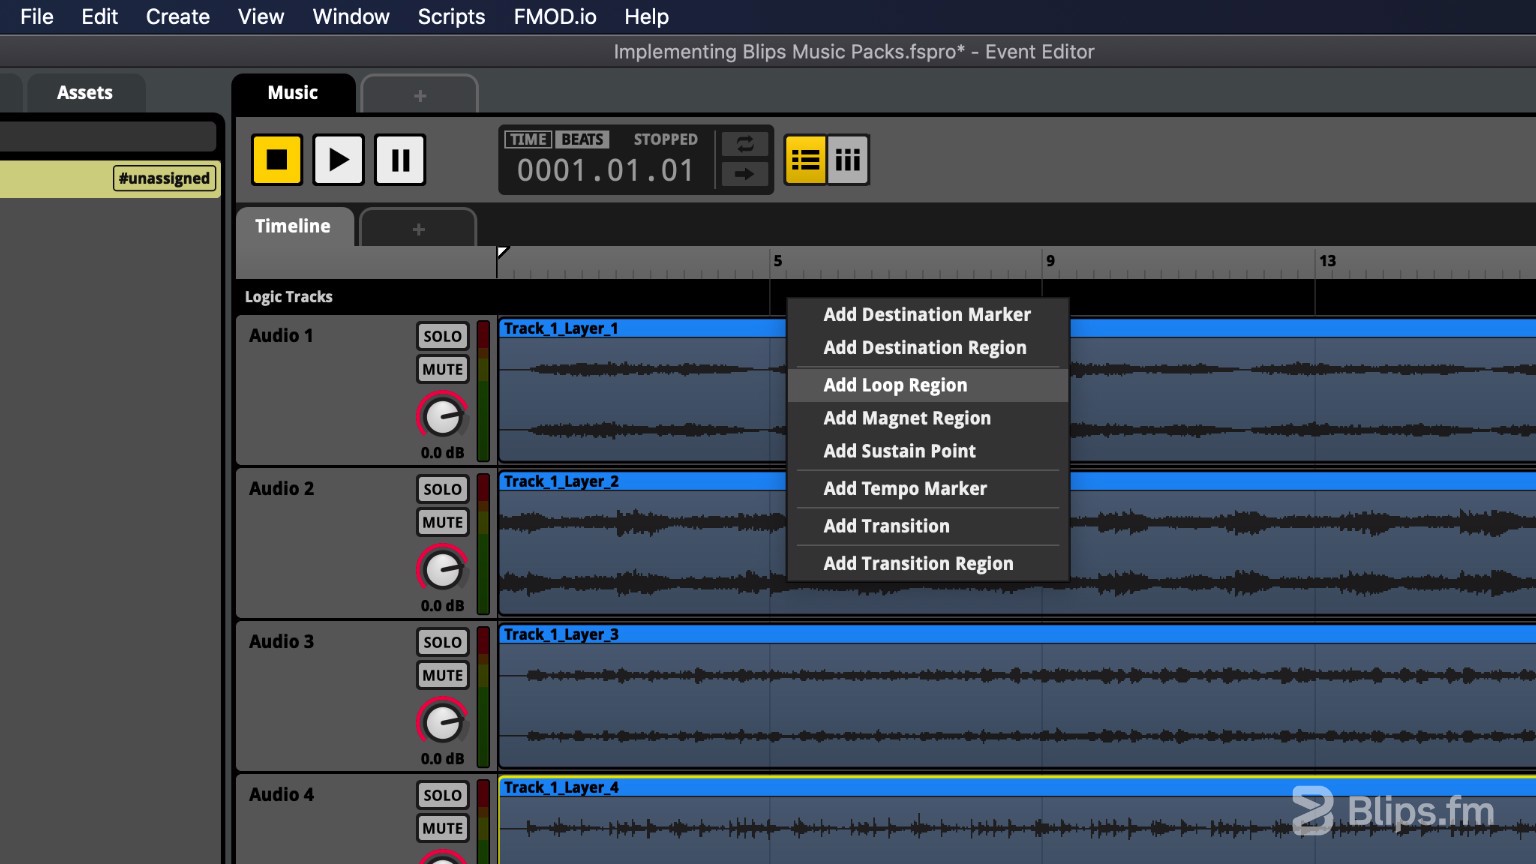
- To make the track loop seamlessly, add a loop region. Above the audio tracks you'll find a small black bar with the name “Logic Tracks”, right click on this bar and select “Add Loop Region.” A blue bar with handles will appear, and you'll need to extend/shrink it to wrap the layers beginning and end. This blue bar snaps to these locations to make it easier to set them. If needed, to make it easier to see the whole track, you can adjust the zoom level by compressing or expanding the zoom region, you can find the zoom region right below the audio tracks. The zoom region represents the track's arrangement above. You can also press the "D" key to hide de "Deck" below the zoom region to give you more vertical space on screen.
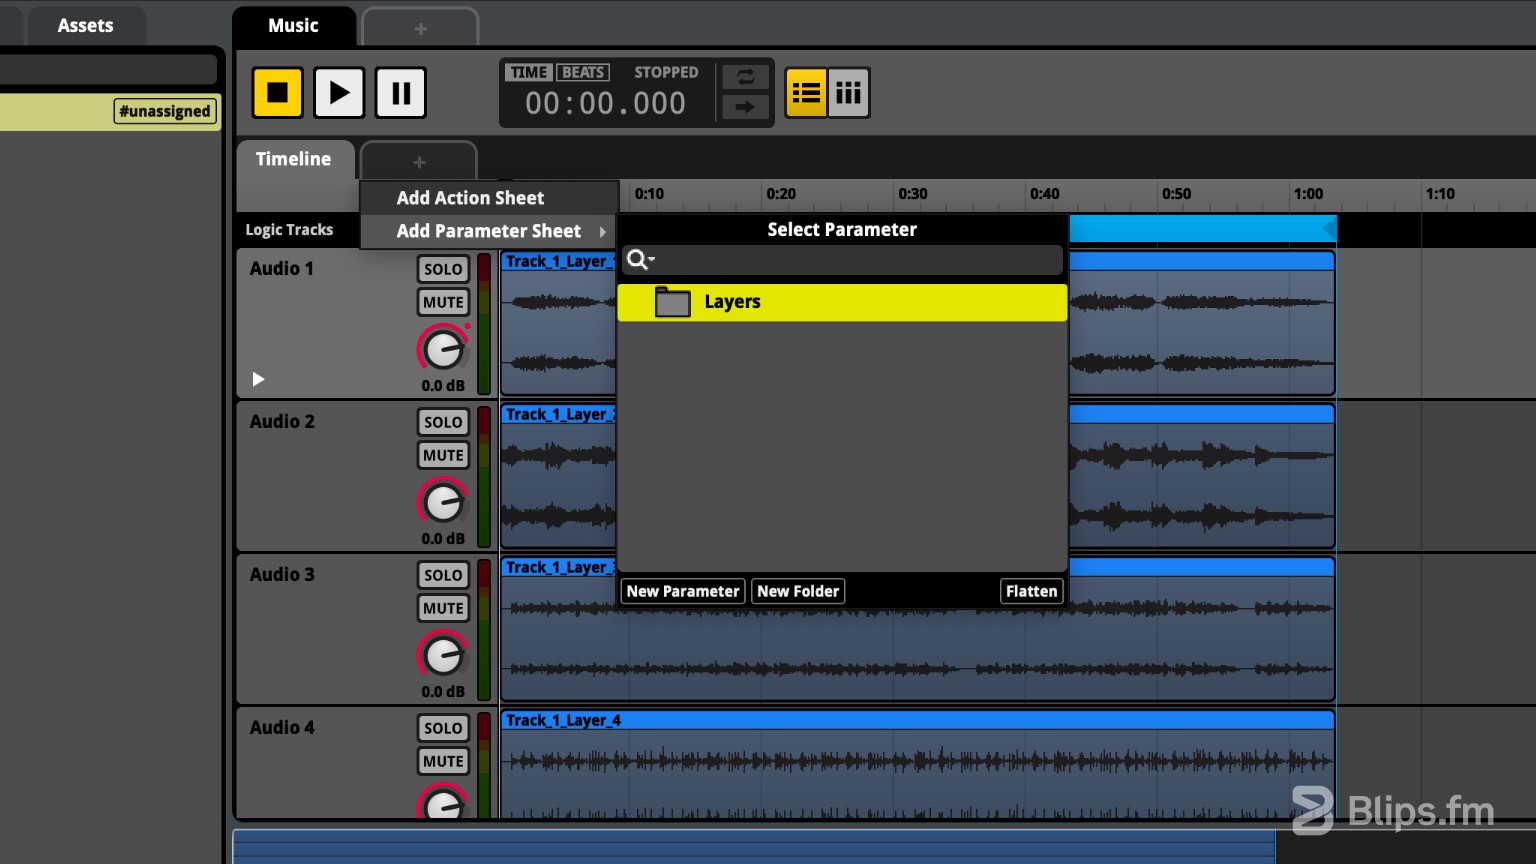
- Because with my four layer track there's 30 possible layer combinations, it's easier to just create parameters to activate and deactivate each layer than creating a unique parameter to change through all of them. To create parameters, click the “plus” button next to the “Timeline” tab. Mouse hover to “Add Parameter Sheet.” On the window that appears click “New Folder” and give the folder a name such as “Layers”. After naming the folder and with it selected click “New Parameter.”
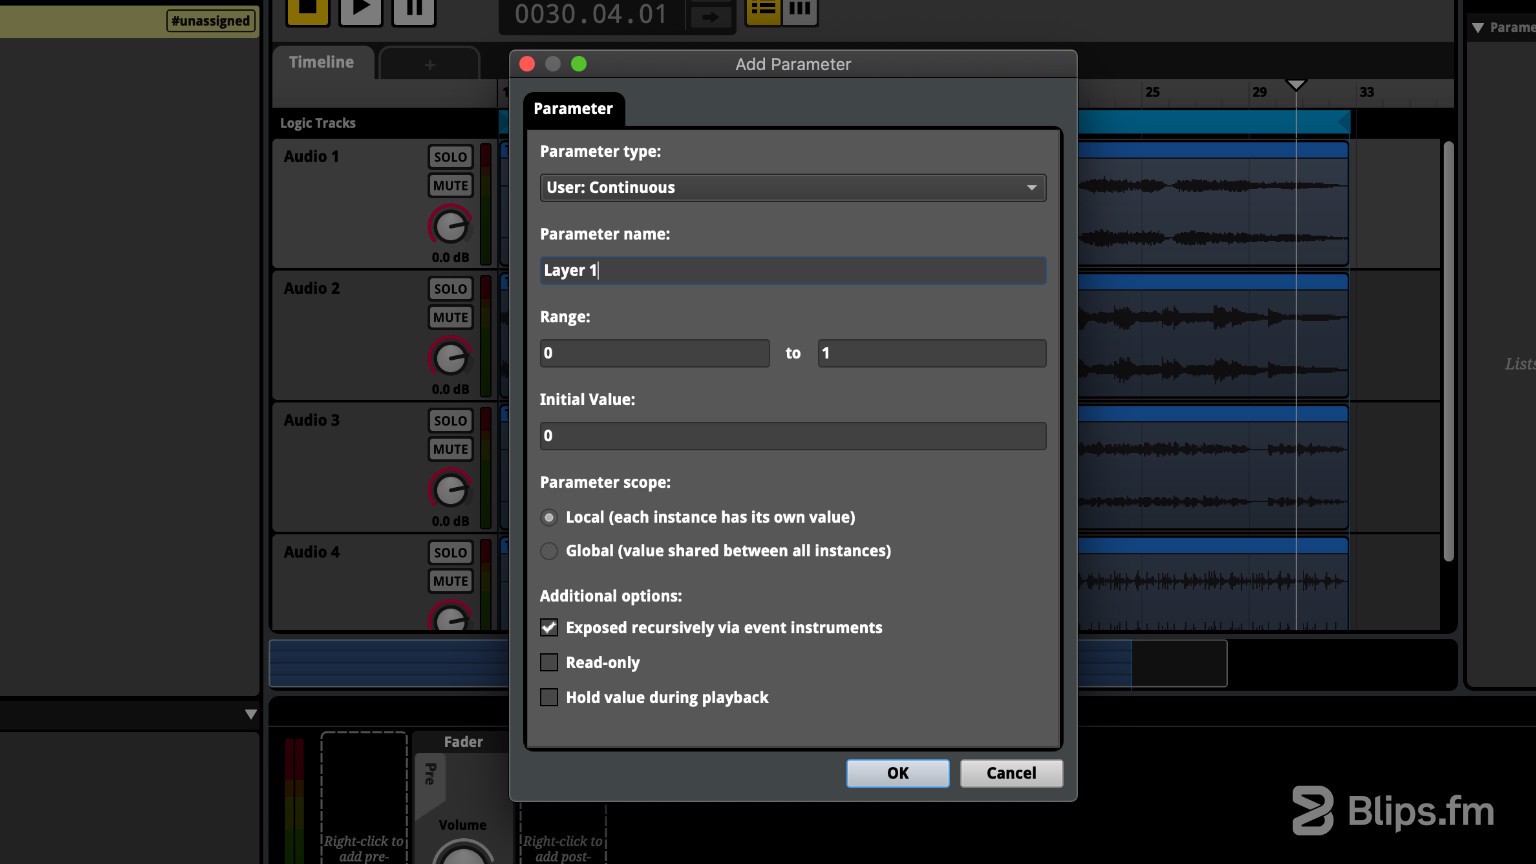
- The “Add Parameter” window appears, leave the parameter type as “User:Continuous”. Name the parameter. I'll use “Layer 1” as this parameter will be used to control this layer. Leave the other parameters as is and finish by clicking “OK.” You'll be taken to a new tab next to the timeline with the newly created parameter. Notice that the parameter was also added to the toolbar next to the beats/time display.
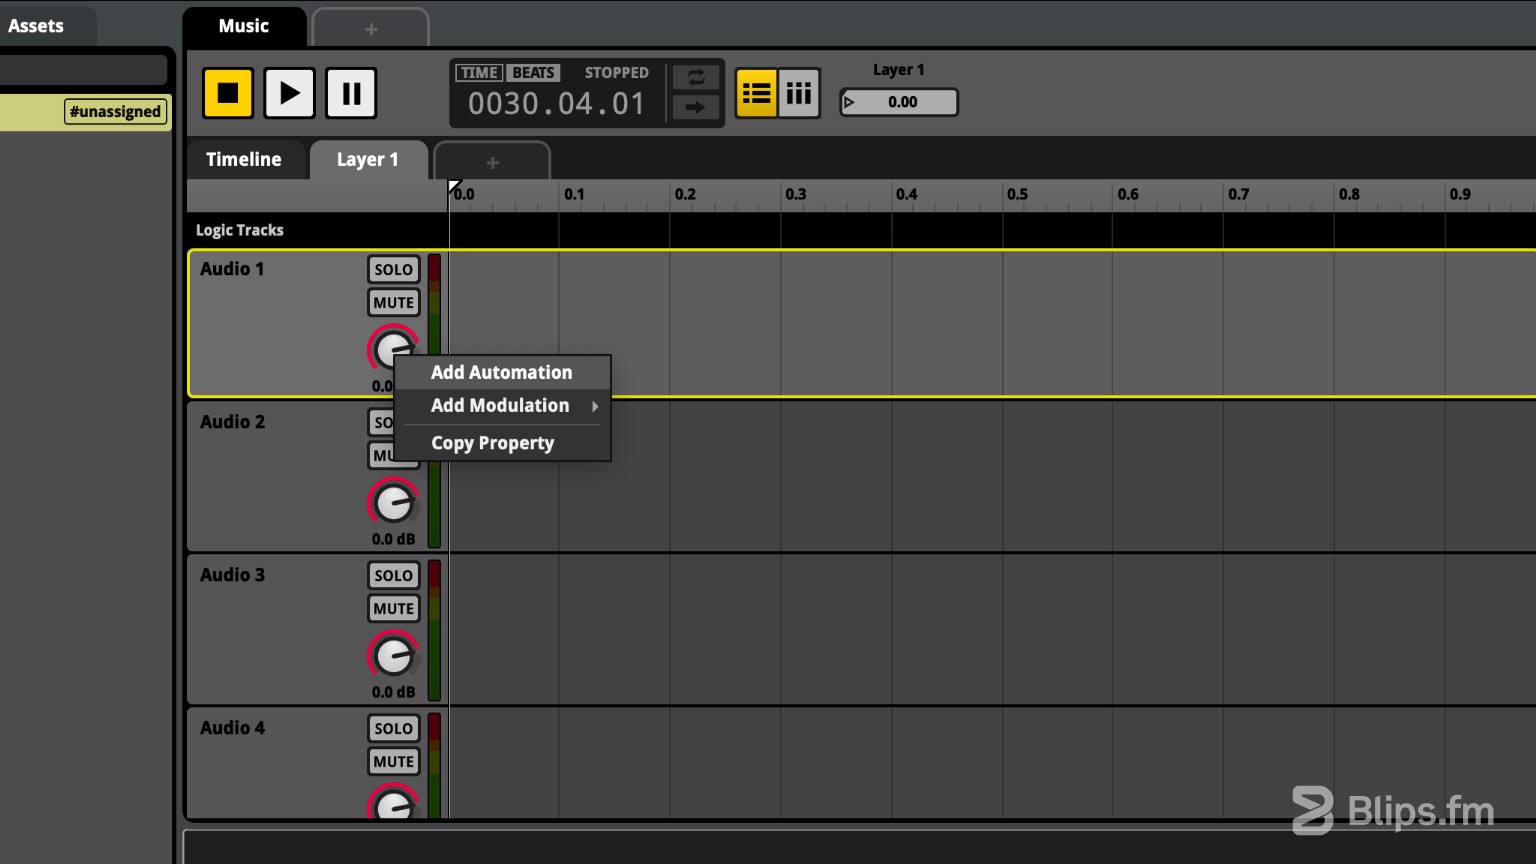
- We'll transition from an on and off state by making use of volume automation. Right click the “Audio 1” volume knob and click “Add Automation.” A dotted red line will appear. Click on this line and a movable dot will be created and added to it. On the far-left side place the dot at "-infinity" dB. Click the line to create another dot and place it on the far-right side at 0 dB.
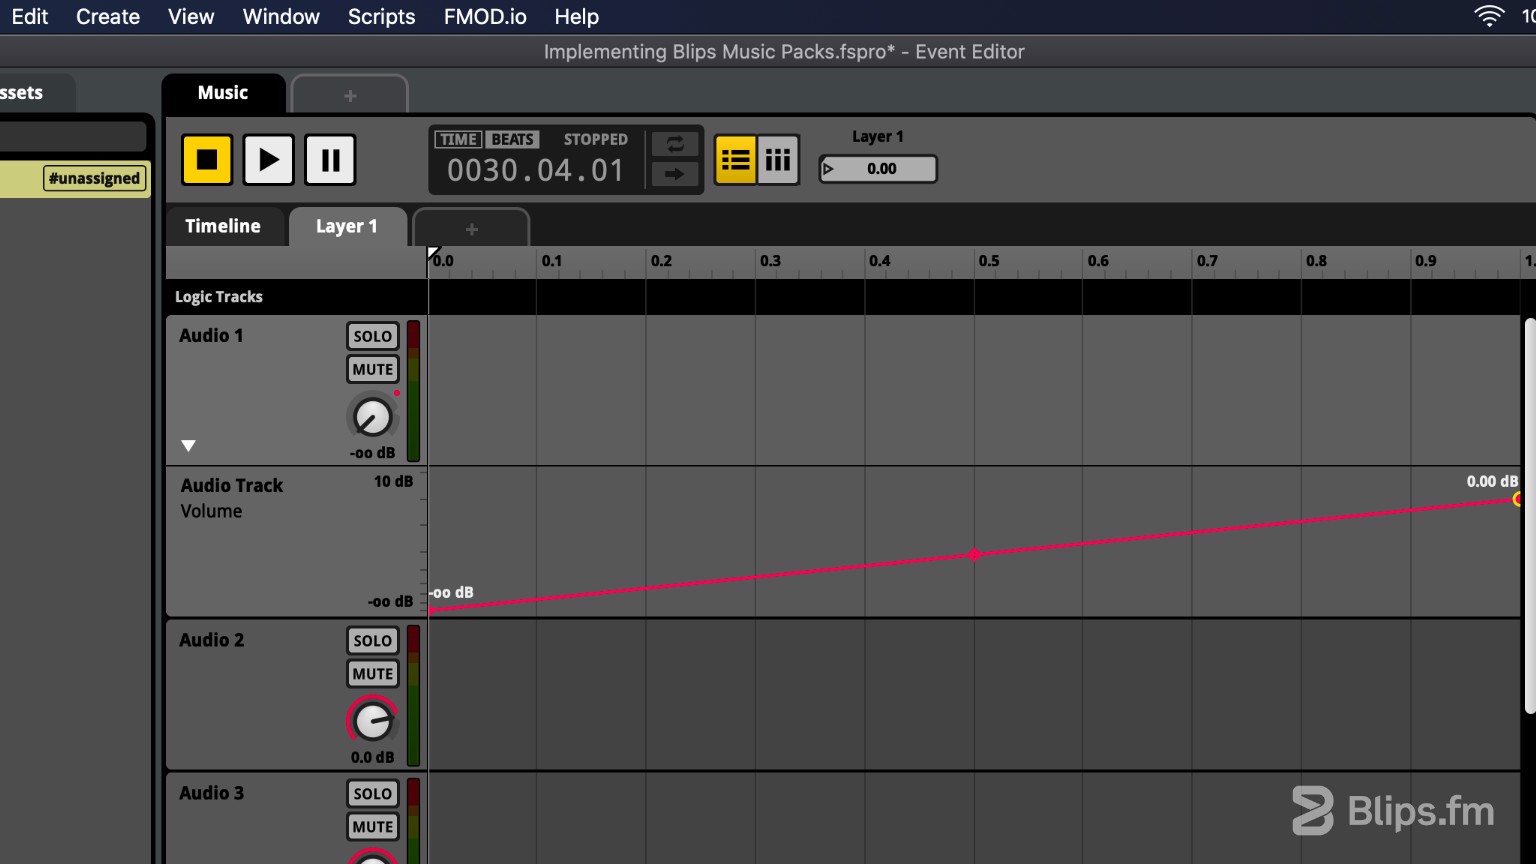
- You'll need to repeat this process (add parameter & add automation) as additional parameters will be needed to control the remaining layers. For the parameter you'll create named “Layer 2“ you'll need to add automation to the “Audio 2” track, and so on. Each parameter should only have volume automation for the respective audio track.
- You'll now be presented with four parameters that control each individual layer, they appear on the top (transport) bar. Since we used the value defaults on parameter creation the parameter values go from zero to one. Zero means layer off, and one means layer on.
You can drag on the parameter boxes to gradually change the value, or you can input the value directly by clicking on the “arrow” present inside the parameter box. By changing the parameter value you'll now see the change reflected on the volume pot of each layer.
- Layer activation/deactivation is now set up but if you attempt to change a parameter's value by directly inputting 0 or 1 while the track is playing you'll notice that the change is abrupt, it will turn the layer on and off immediately. To make the transition between states smoother, we need to define a time interval to interpolate between the off and on values, essentially creating a “fade-in” and “fade-out” for each layer. To do this, go to the window menu and click “Preset Browser”, on the presented “Parameters” tab you'll see the folder we created before and the parameters inside.
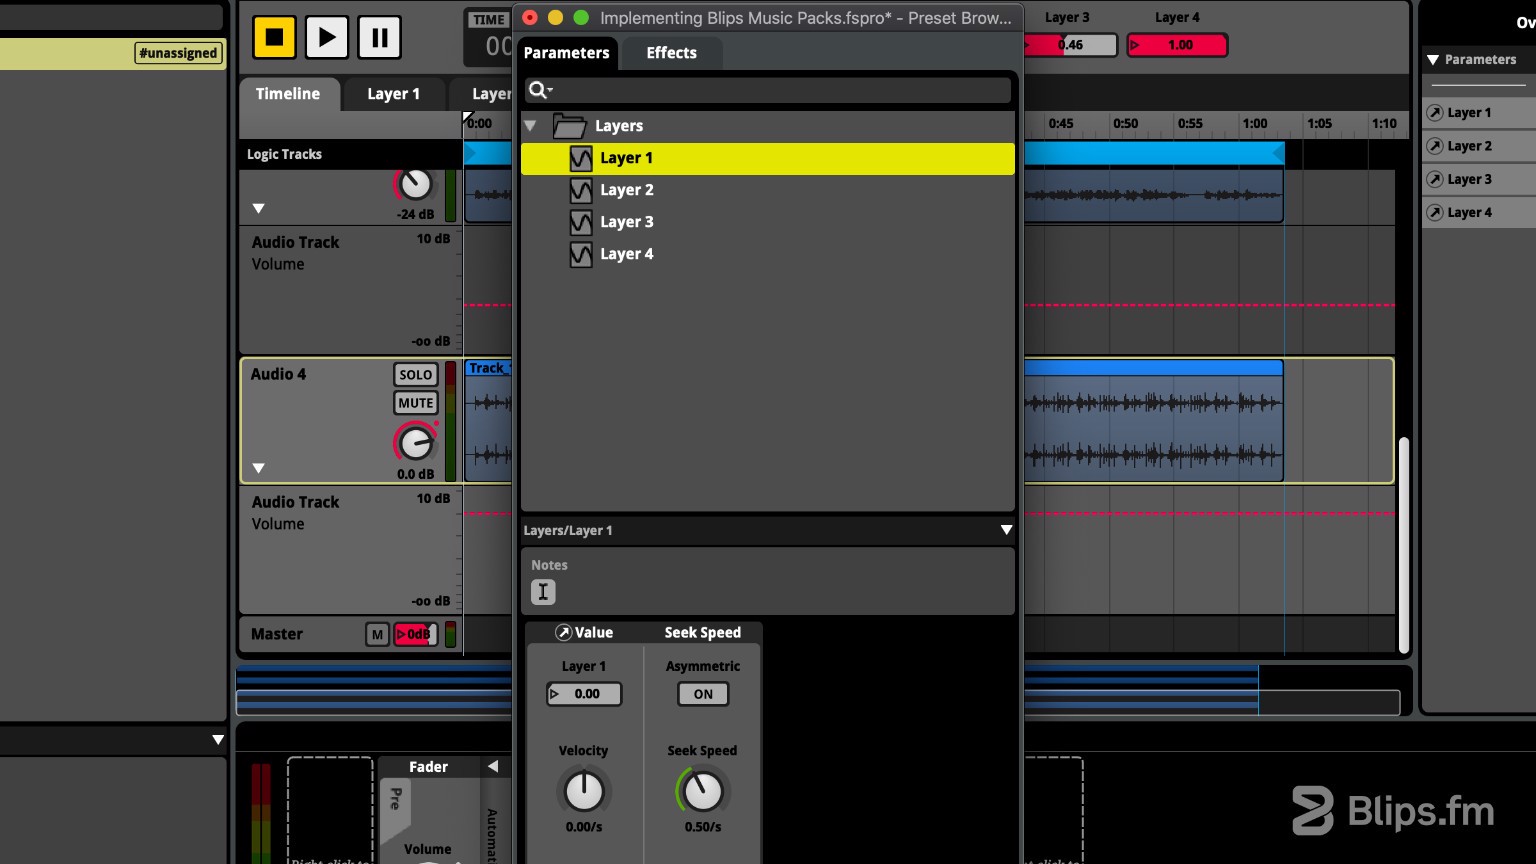
- Select the “Layer 1” parameter. At the bottom of the window, you'll be presented with two options for “Value” and ”Seek Speed.” To create this “fade-in” and “fade-out” effect just set the “Seek Speed” to a setting other than “Instant.” A two second fade generally works well, so I have set a “Seek Speed” of 0.50/s, this means the parameter will travel in 0.5 increments per second, since our parameter goes from zero to one, it will take two seconds. You can of course choose the fade time that sounds best for you.
- Select the remaining parameters and set them to the same seek speed. After doing this you can close the “Preset Browser” window.
- If you now try to set a value while the transport is playing you'll see a yellow dot moving through the range while it reaches the destination value, you'll also hear a smooth layer addition and removal.
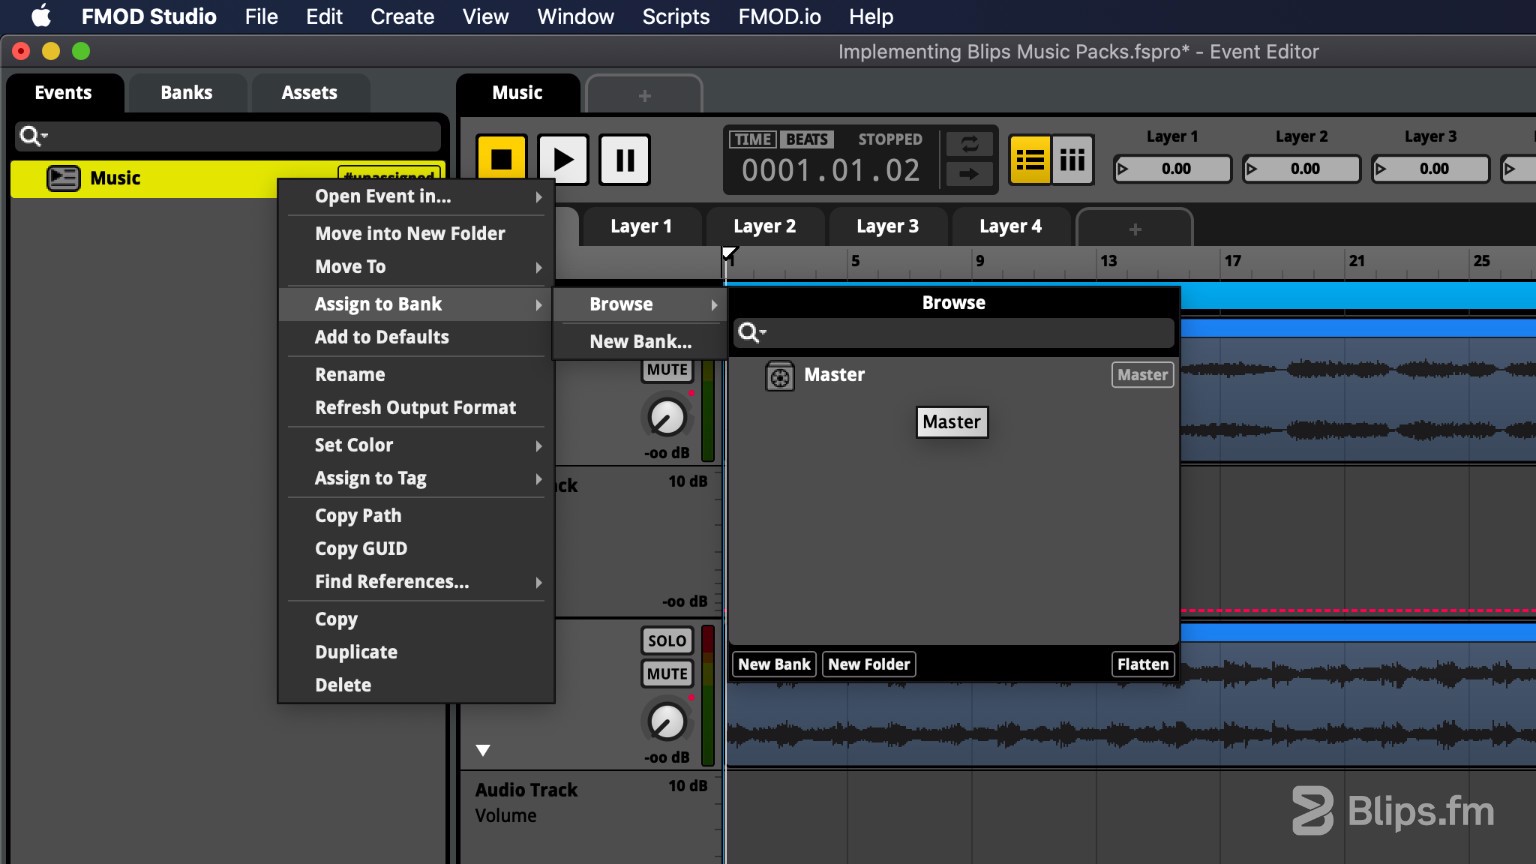
- As the final step we need to assign our FMOD "Music" event to a Bank. Because this is a simple project and we only have one event we'll just add it to the “Master Bank.”
- On the “Browser” Pane select the event, right-click and hover to “Assign to Bank”, then hover to “Browse” and finally click “Master.” If no bank is present on the "Browse" window, click "New Bank" and give it the name "Master" or a name of your choice. Also make sure that the created bank has the "Master" tag by going to the "Banks" tab, right-clicking on the bank and selecting "Mark as Master Bank." After assignment you'll see the #unassigned tag on the event disappear.
This concludes part one of this tutorial. If you followed all the steps above you should now have a functional adaptive music system where you'll be able to start and stop tracks and control each track's layers individually. In the next part you'll learn how to use “Horizontal Sequencing” to make transitions between tracks seamless.
How to implement Blips music packs in FMOD (Part 2).
If you have any question or problem while following this tutorial feel free to leave a comment below and we'll try to help however we can! Feel free to share your own techniques if you have them as well, as we would love to hear them!