Godot 4.3 brings exciting new features that make it easier to incorporate adaptive music into your games. In this article, I'll go over the new additions, explaining their functionality and how you can use them in your projects.
The adaptive music capabilities come from three new audio stream types: AudioStreamInteractive, AudioStreamPlaylist, and AudioStreamSynchronized. These can be combined to create complex musical behaviors, offering functionality typically reserved for audio middleware solutions like Wwise, FMOD, or CRI ADX2.
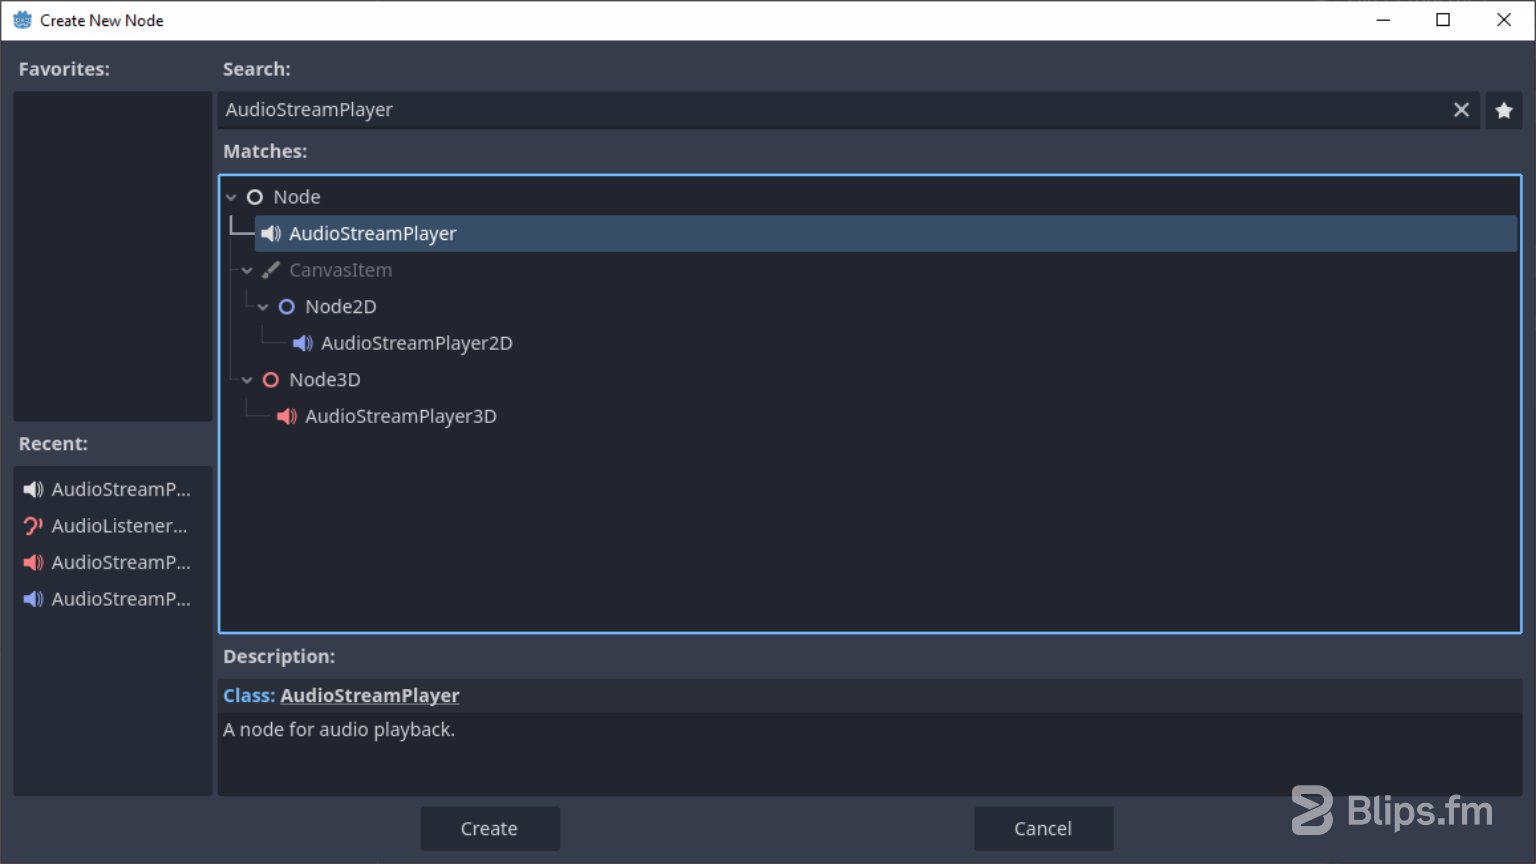
To use any of these new AudioStreams, you'll need to add an AudioStreamPlayer to your scene. This can be the standard AudioStreamPlayer or its 2D/3D variants. Since music is typically not played with positional audio, I'll be using the standard AudioStreamPlayer in the following examples.
AudioStreamPlaylist
Let's start with AudioStreamPlaylist, which offers the simplest functionality. This AudioStream allows you to play a list of tracks either sequentially or in a random order. This feature is especially useful in situations where players might spend a long time in one area of the game. The musical variety provided by this method helps minimize repetition and prevents the audio from becoming tiresome. Another use case for a music playlist is when audio is coming from an in-game object, like a radio.
Here's how to set up a music playlist in Godot 4.3 using the new AudioStreamPlaylist stream:
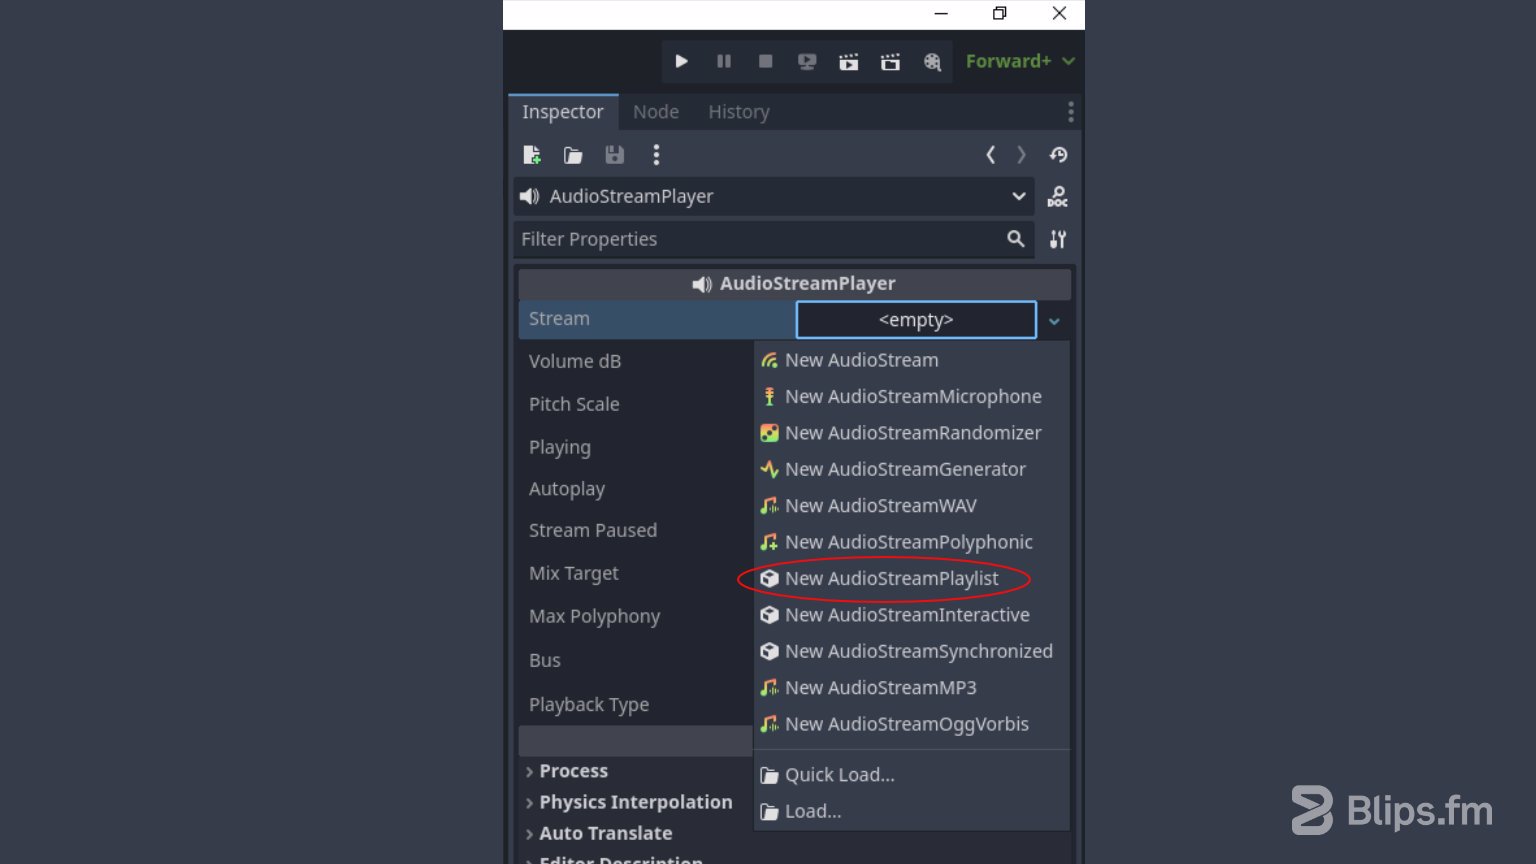
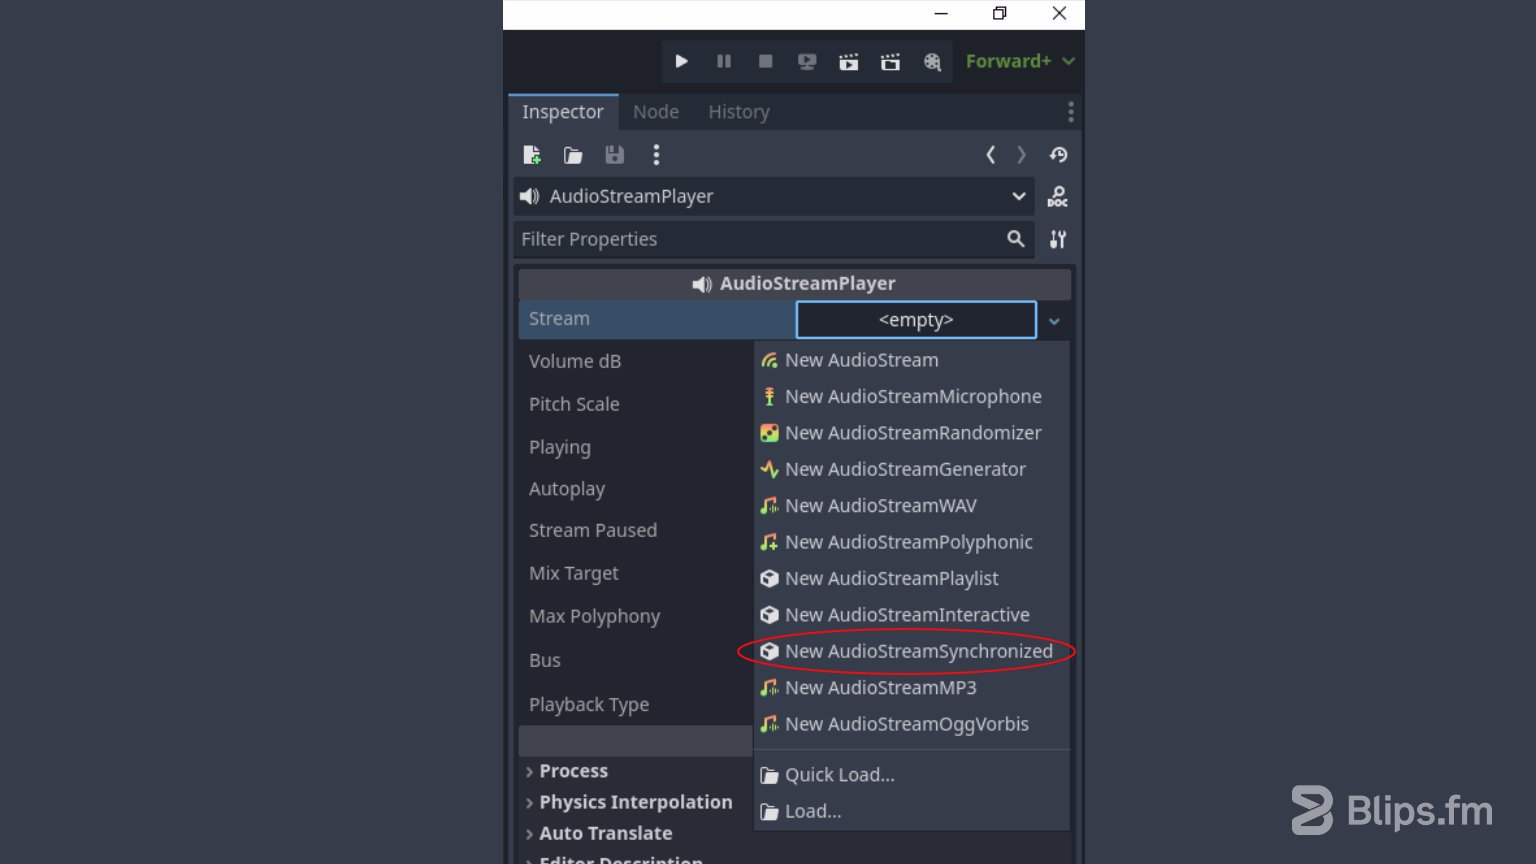
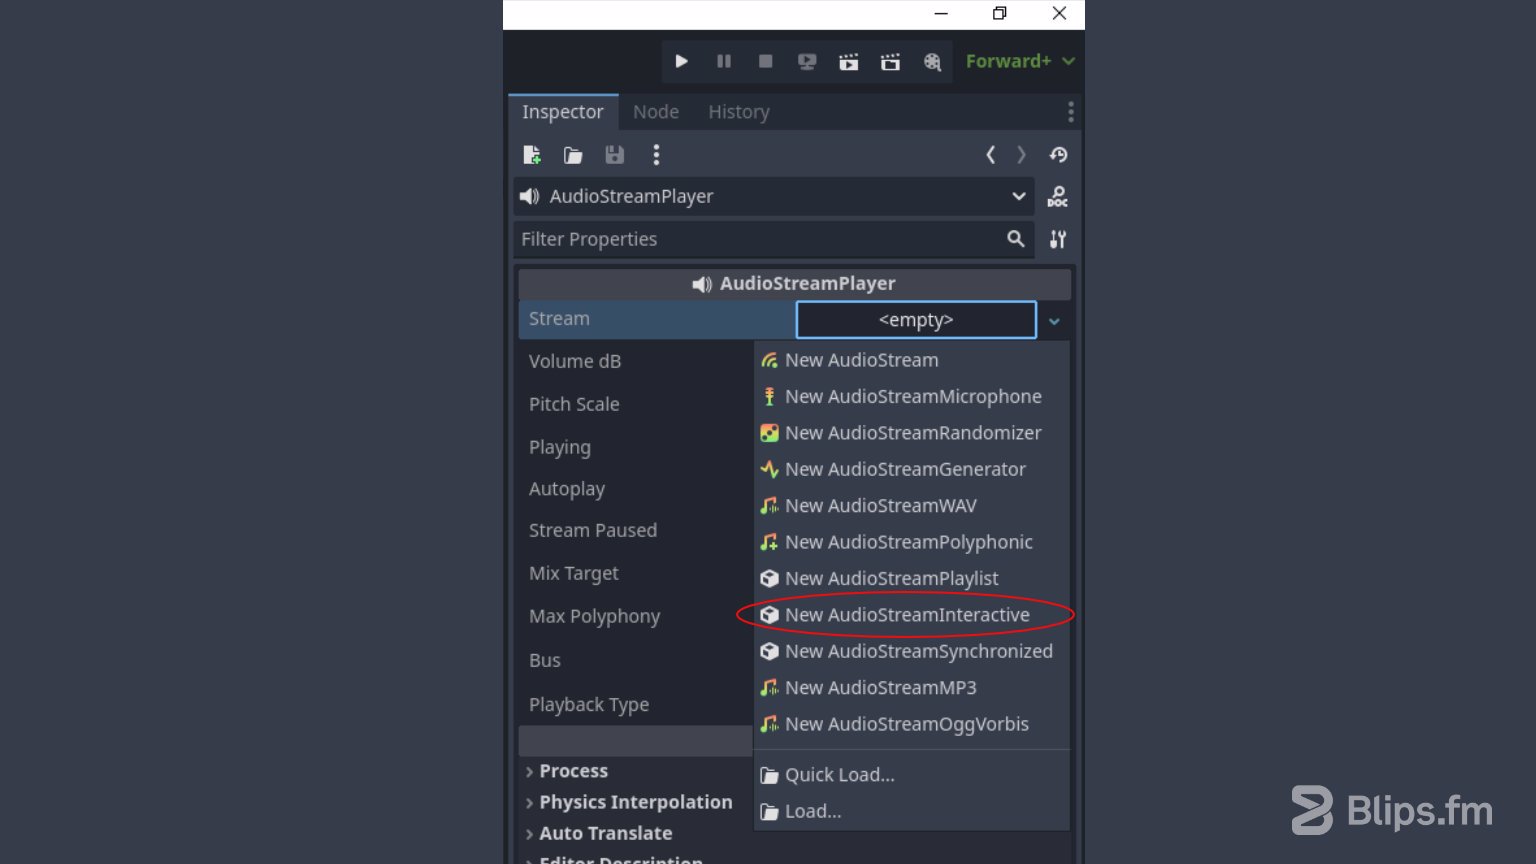
- 1. With a new AudioStreamPlayer selected in the scene, go to the Inspector and click the <empty> stream field. You'll be presented with a list of AudioStream types, including the newest additions. Select New AudioStreamPlaylist.
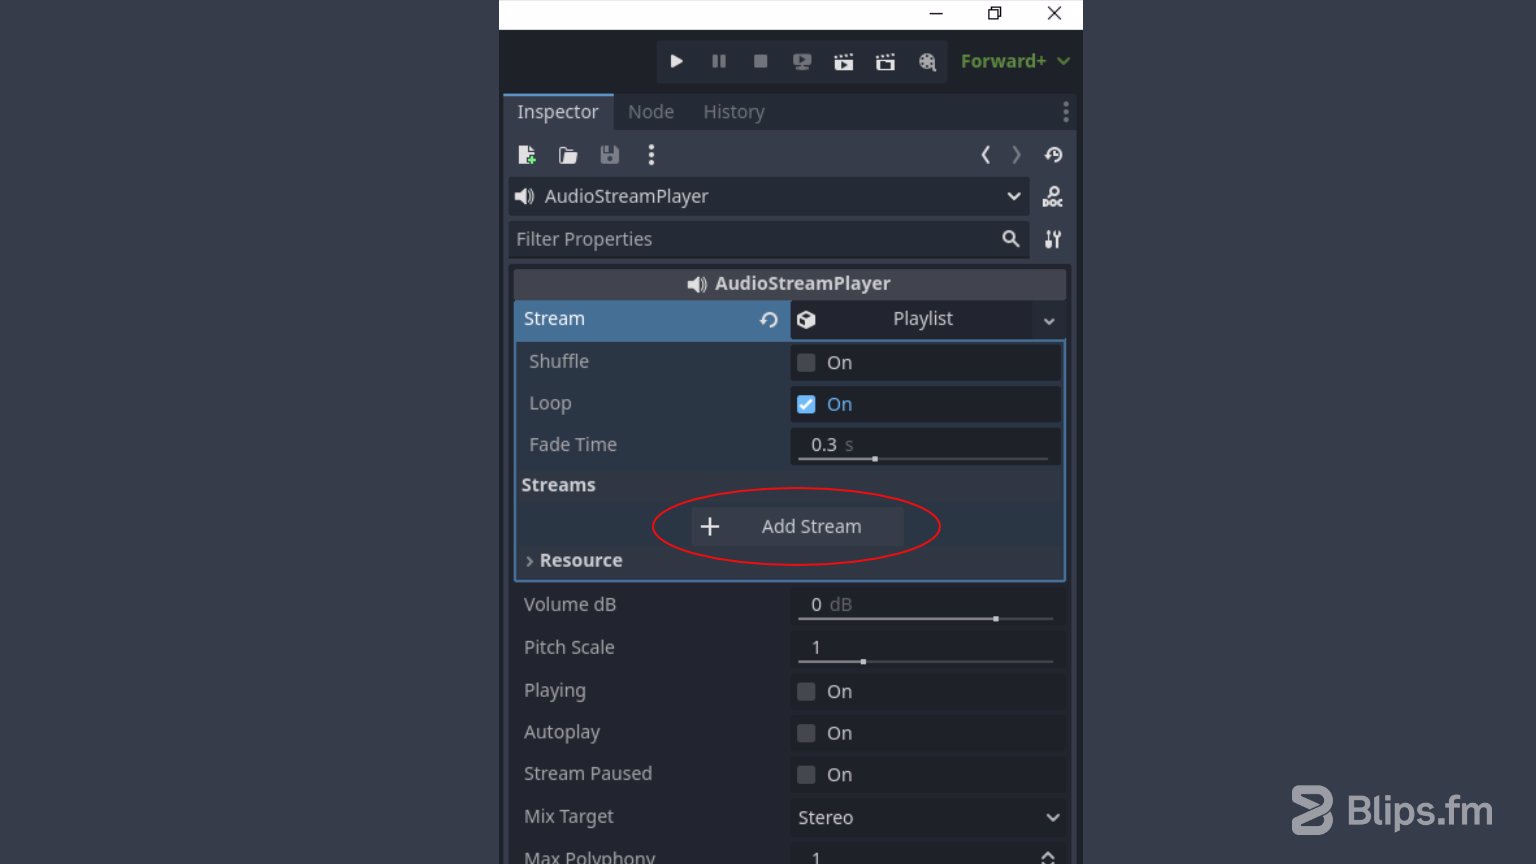
- 2. Now click the same field again to reveal the playlist options. At the bottom, you'll see an Add Stream button. Click this button and add as many streams as there are audio tracks for your playlist.
- 3. Next, using the FileSystem browser (assuming you have already imported the audio tracks into your project), drag each of these audio files to each Element field, replacing the <empty> tag.
That's it! The AudioStreamPlayer is now set up to play these music tracks sequentially. You can preview your playlist by checking the Playing checkbox.
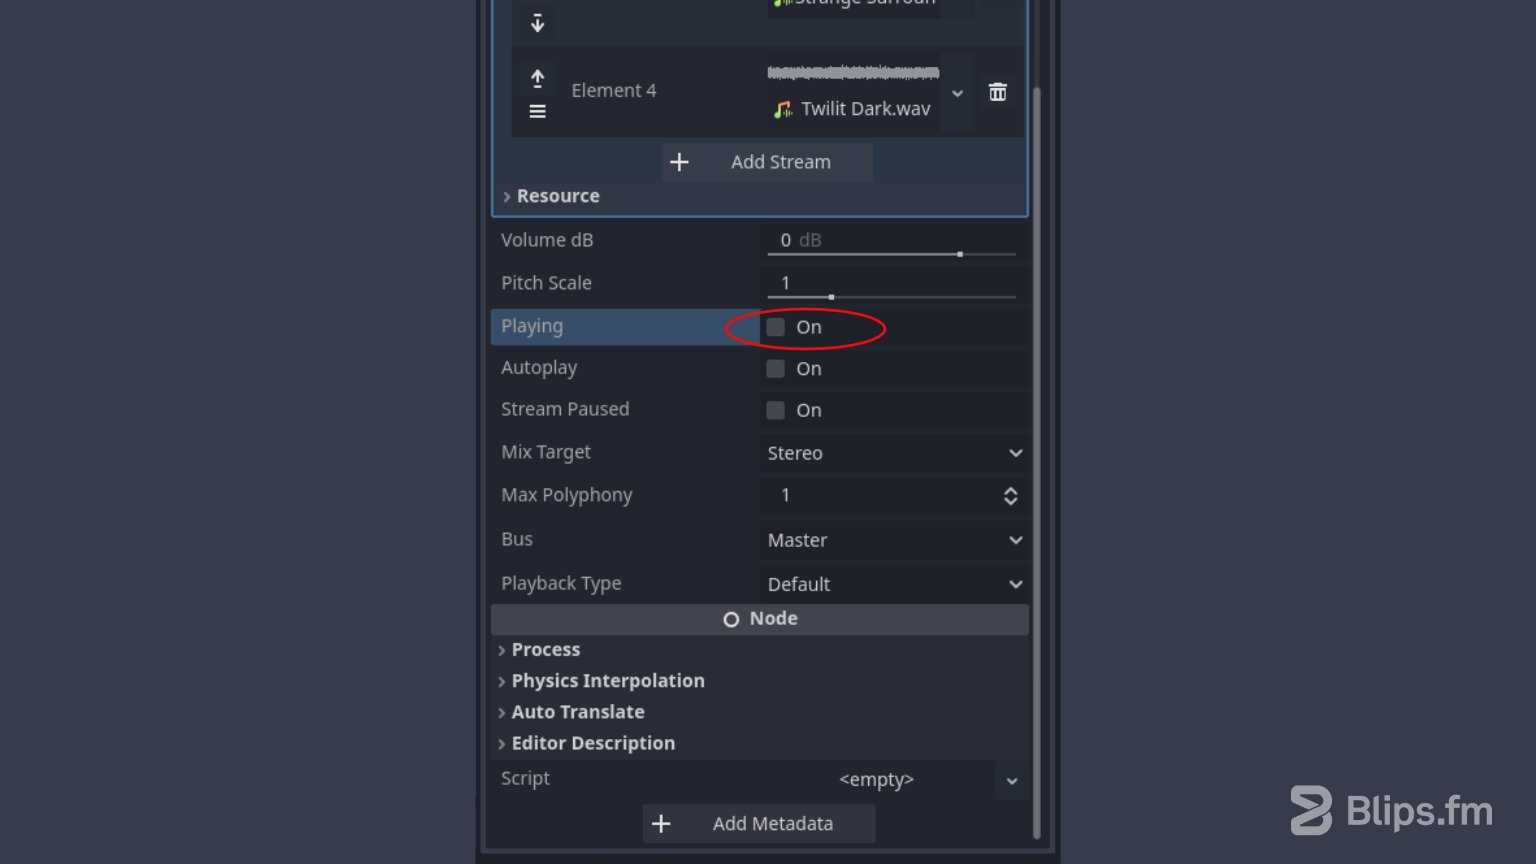
The AudioStreamPlaylist also offers additional options, giving you greater control over the playlist behavior. These options are found above the Streams section containing the music tracks. The available options are Shuffle, Loop, and Fade Time.
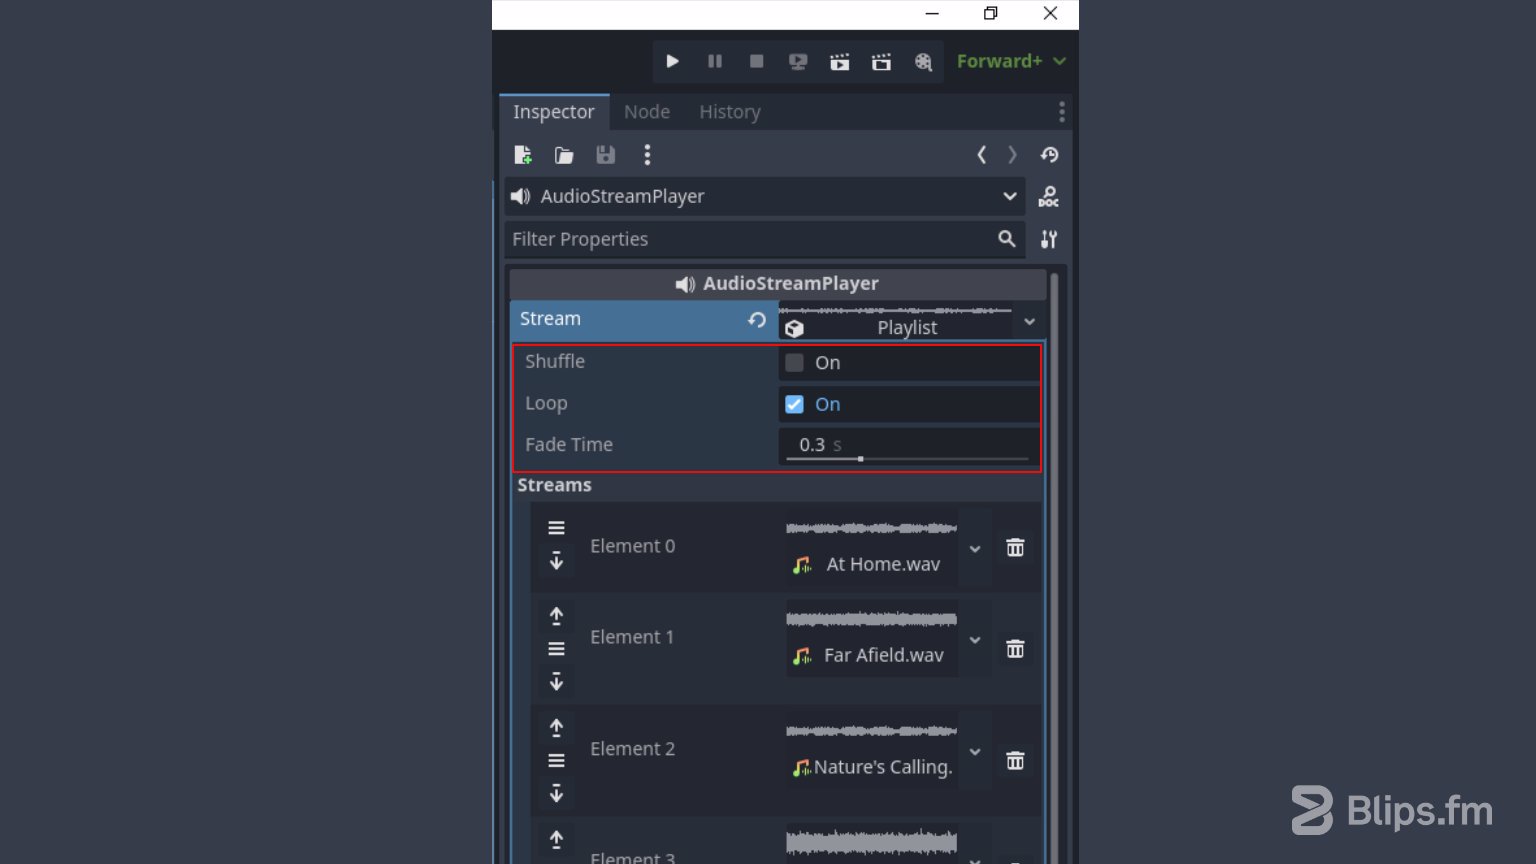
The Loop option makes the playlist restart every time it reaches the final track.
The Shuffle option randomly selects a new track to play when the current track ends. A random track is also chosen whenever playback starts or when the playlist loops.
The Fade Time option smooths transitions between tracks and is set in seconds. This value determines how long it takes for the volume to fade out when switching to the next track. Fade Time can be set between zero and one second and can be adjusted according to the musical material.
AudioStreamSynchronized
AudioStreamSynchronized allows you to play multiple audio streams simultaneously and in sync. You might wonder how this is useful — well, it's actually quite useful for implementing a popular adaptive music technique: Vertical layers.
With the vertical layers technique, music compositions are divided into individual layers, each containing different instruments, rhythms, melodies, or harmonies. These layers function like separate tracks that you can enable, disable, or combine as needed, allowing you to adjust the complexity of the music dynamically. This technique facilitates fast and smooth musical transitions.
For example, it can be used to switch between game states during gameplay, such as moving from exploration to an alert state or engaging in combat.
Now, let's go over how to implement this functionality using AudioStreamSynchronized.
Since we're talking about implementing adaptive music with the vertical layers technique, you'll need a music track designed for this purpose. Fortunately, all Blips.fm music packs are created with adaptive music in mind, so you can easily follow along by downloading one of the free packs available.
- 1. With a new AudioStreamPlayer selected in the scene, go to the Inspector and click the <empty> stream field (you can also clear a previously added stream by clicking the field's right arrow and selecting Clear). Select New AudioStreamSynchronized, then click the same field again to expand the Stream options.
- 2. Click the Add Stream button and add as many streams as there are track layers. In a Blips music pack, files are named with the track number and layer number, e.g., Track1_Layer1, Track1_Layer2, etc. Note that in this example, we're adding only one track, with the added streams corresponding to the track layers.
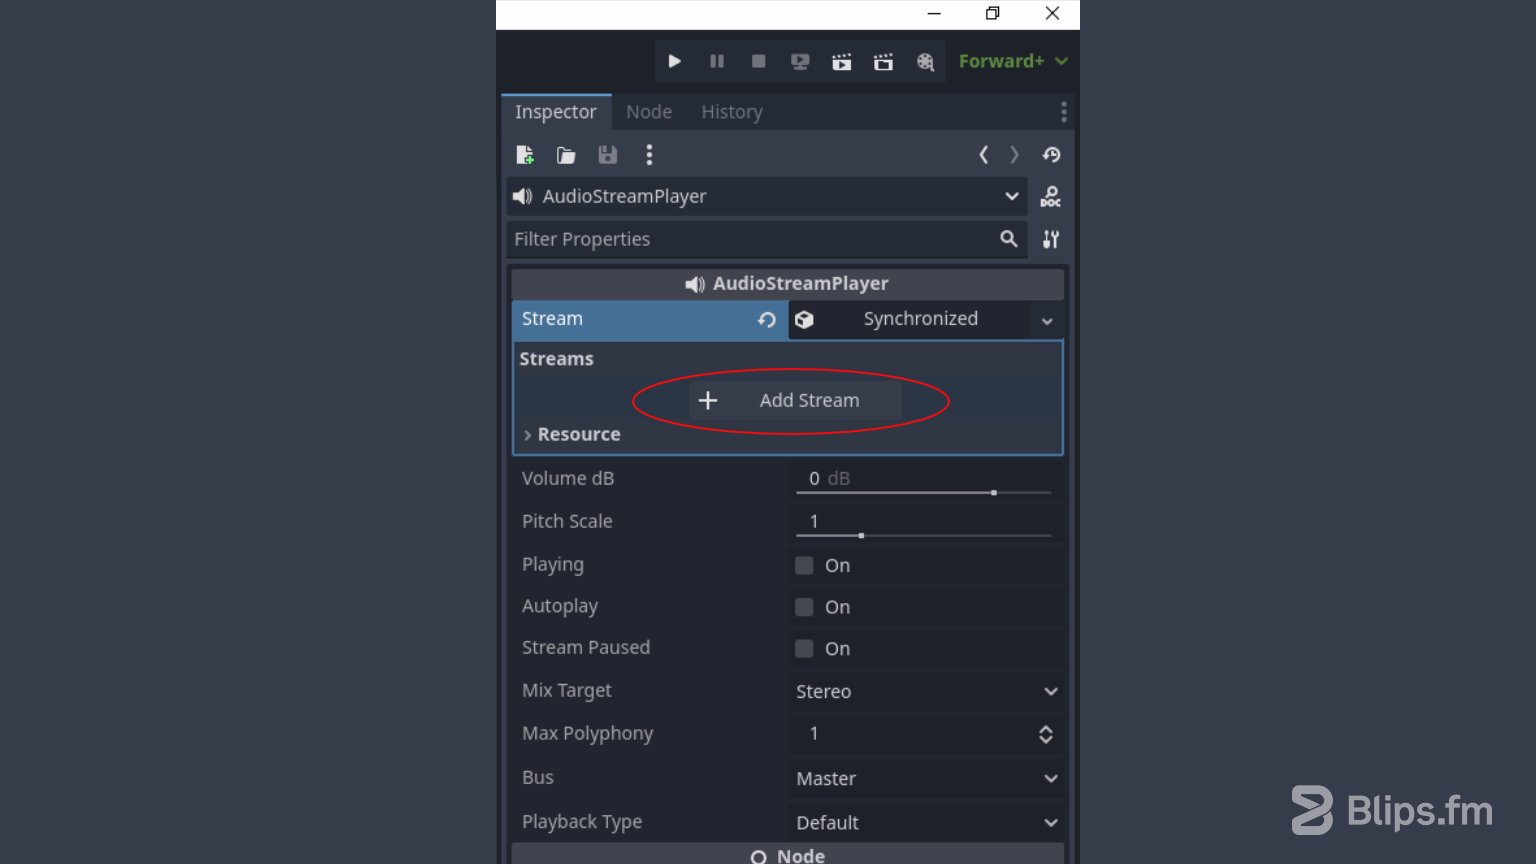
- 3. Now, using the FileSystem browser and once again assuming you have already imported the files into your project, drag each track layer to the corresponding Stream field under the <empty> tag.
You'll now be able to hear the full composition by checking the Playing checkbox below the Stream layers you added. You can add, remove, or transition between layers during gameplay by controlling the individual volume of each layer via scripting.
It's worth mentioning that the multilayered tracks inside a Blips pack are designed for use during gameplay and are intended to loop seamlessly. The AudioStreamSynchronized stream also supports looping sources, so it's simply a matter of enabling looping for each layer file in the Import tab.
AudioSreamInteractive
AudioStreamInteractive allows you to use multiple tracks and manage transitions between them using a transition table. Unlike AudioStreamPlaylist, which only supports sequential or random track changes, AudioStreamInteractive lets you change tracks as needed, with transitions that respect pre-specified criteria. These transitions can also be smoother, as they can align with the beats and tempo of the music.
I'll explain how this works in the following example, but first, we need to ensure we're using the right audio file formats for this task. You can choose between compressed formats like MP3 and OGG, though I recommend using OGG. Uncompressed formats like WAV aren't suitable for this task in Godot because they don't support setting BPM (beats per minute) and time signatures.
For a deeper dive into game audio formats, be sure to check out this article: Game audio files: A quick developer's guide.
To keep things simple, I'll set up a straightforward yet realistic music system for a small game. I'll be using four different tracks: one for the background music in a village, another for when the player leaves the village and ventures into the woods, and two shorter tracks — one for when the player successfully completes a task and another for when the player fails or dies.
This time, I'll be using a larger Blips music pack that includes two multilayered tracks (Pack M), along with the Win and Lose tracks, which are available in every pack. I'm using "The Gentleman." To follow along, you can either download this free M pack or use multiple packs. To keep things simple, I won't be using the additional layering options; I'll only use the first layer of each track.
- 1. First, after importing the audio files, we need to set their musical information. This can be done in the Import tab. We'll need to perform this setup for each track we'll be using, including the two main tracks and the ones named "Win" and "Lose."

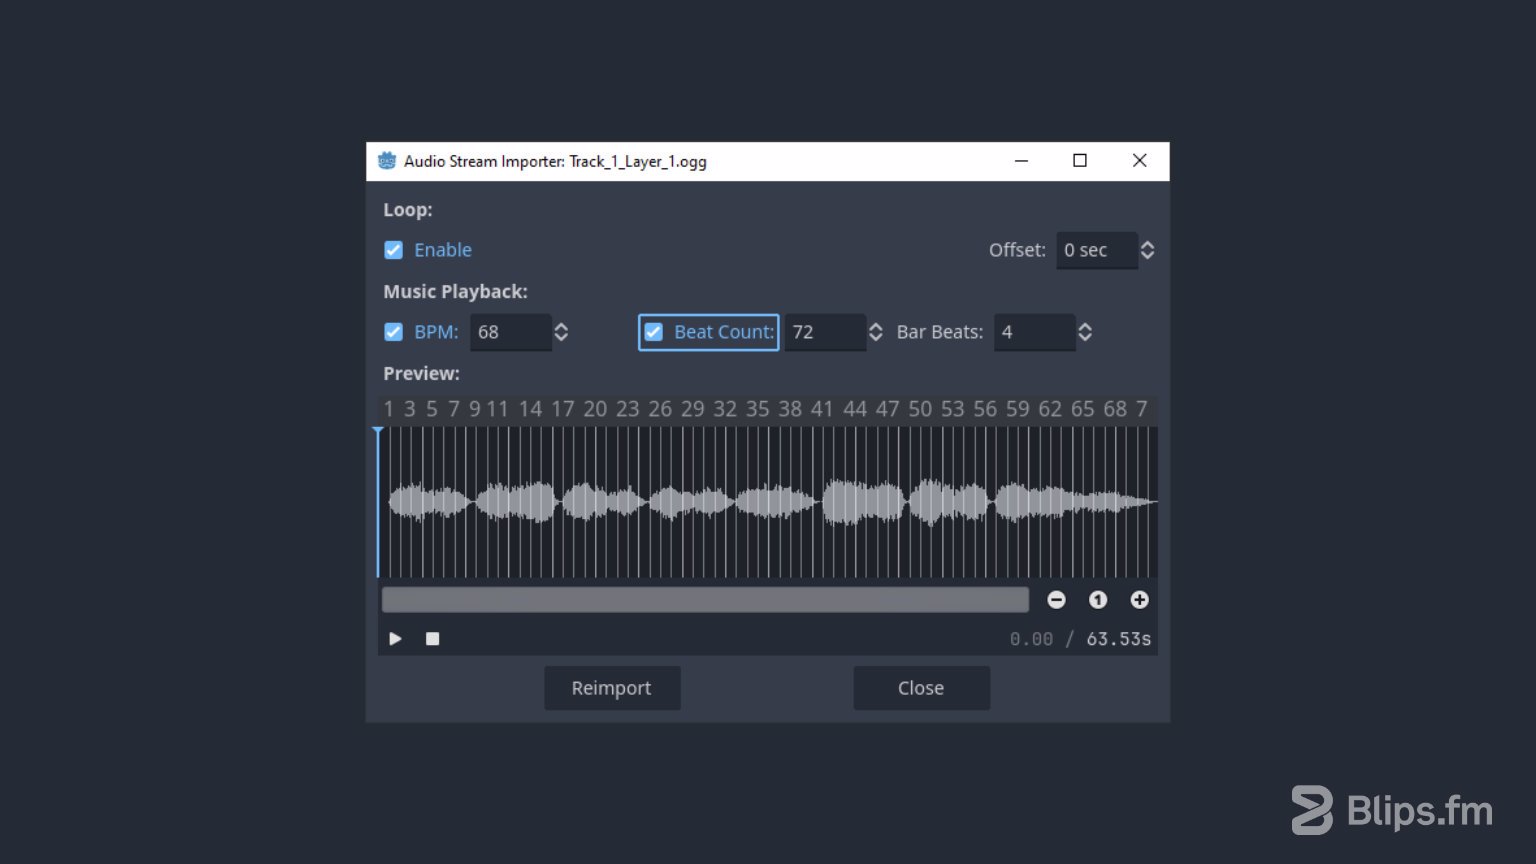
- 2. For each of these tracks, ensure they are selected and click the Advanced... button in the Import tab. In the window that appears, make sure to enable Loop for the main tracks but leave it off for the "Win" and "Lose" tracks.
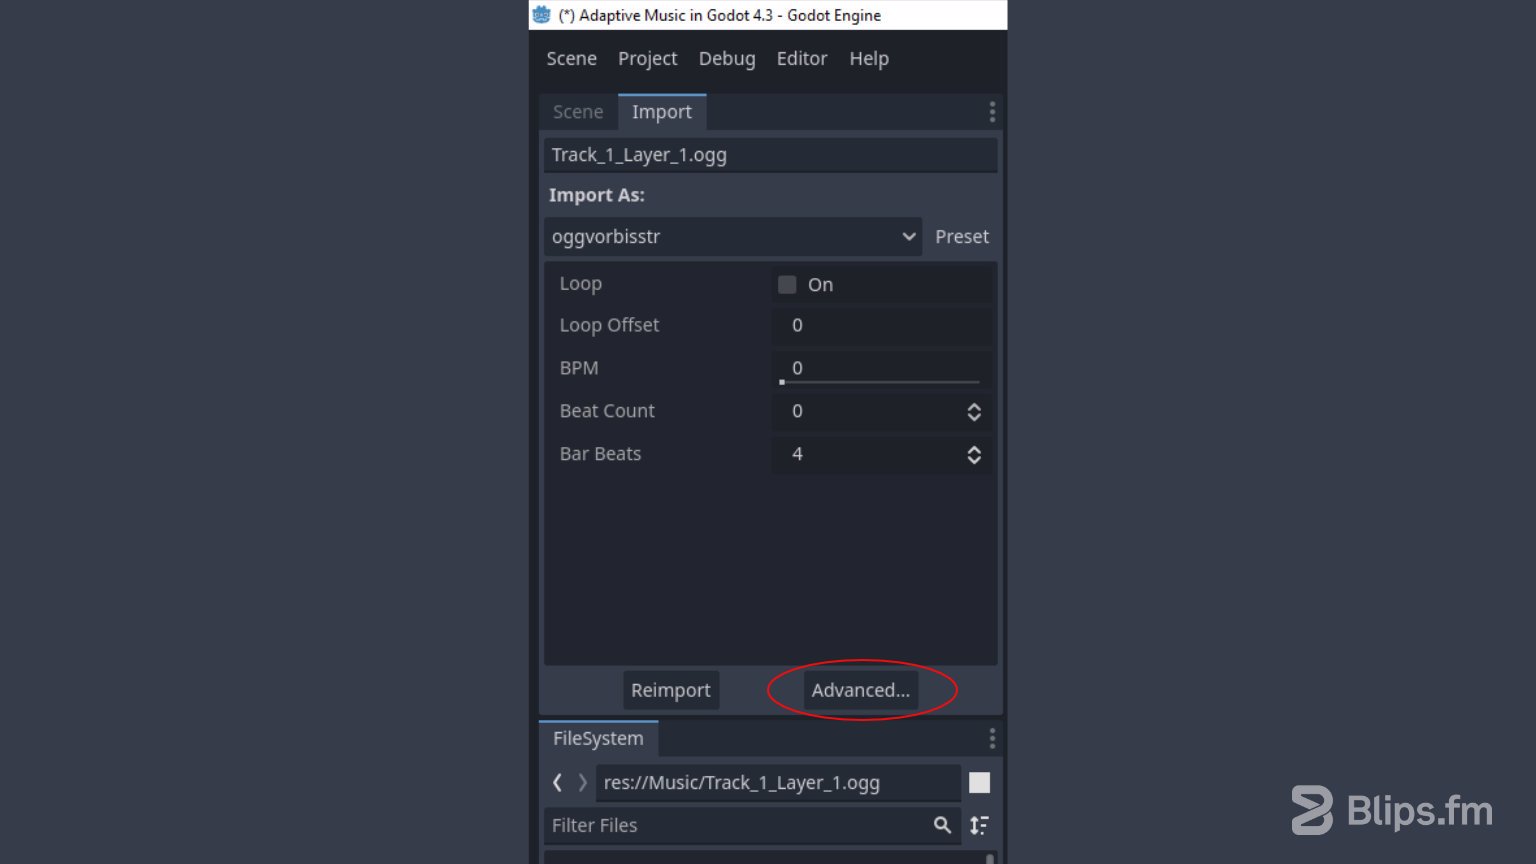
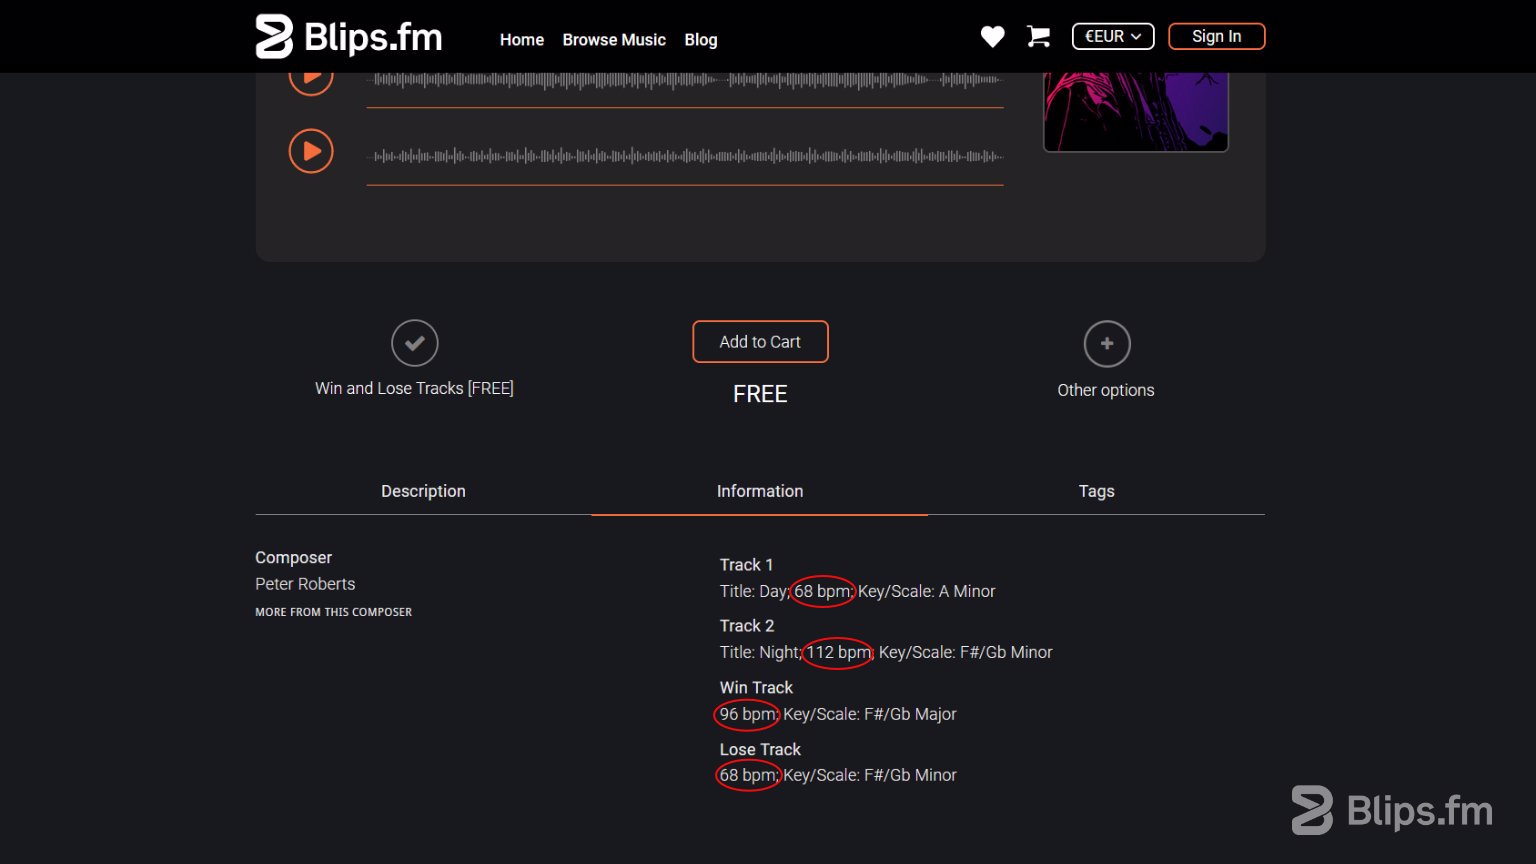
- 3. Next, enable the BPM checkbox and set the BPM value for the track. If you're using a Blips pack, you can find this information on the pack's page in the Information tab.
- 4. Then, enable the Beat Count checkbox and set the beat count. The easiest way to do this is to click and drag over the beat numbers above the waveform, extending the selection to the end of the waveform until the beat count value reaches its limit. For the Bar Beats field, leave the value as 4, and then click Reimport.
After doing this for all the files, we're ready to set up the stream.
- 1. As before, with a new AudioStreamPlayer selected in the scene, go to the Inspector, click the Stream field, and select New AudioStreamInteractive. Then click the field again to reveal its options. Click the Add Clip button four times to create four clip fields for your music tracks.
- 2. Next, drag the files from the FileSystem browser into each Stream field with the <empty> tag. While the order of the tracks is not functionally important, I prefer to arrange them based on their intended use: the first stream for the village track, the second for the woods track, the third for Win, and the fourth for Lose. You can reorder the clips to your preference by clicking the up/down arrows at the left of the Clips. Drag and drop reordering is also supported.
After this, we're ready to set up transitions between the tracks. In this example, we'll configure smooth transitions between the background music tracks (village and woods) and allow jumps to win or lose states from any of them.
To set up these transitions, click the Edit Transitions button at the bottom of the Clips list. This will open a new window with a transition table.
In this table, the columns represent the Transition From (the starting track) and the rows represent the Transition To (the destination track). Clicking on any cell in the table will let you configure the transition behavior on the right side of the window.
To set up the transitions, follow these steps:
- 1. Let's start by creating a transition from "Track 1" (village) to "Track 2" (woods). Click on the cell in the first column and second row of the transition table. On the right side of the window, check the Use Transition checkbox.
- 2. For the Transition From field, select Next Bar. This means "Track 1" will transition to the next track as soon as the next musical bar is reached, resulting in a smooth transition, especially if the track features drums or percussion.
- 3. Set the Transition To field to Prev Position. This ensures that if "Track 2" was previously playing, it will resume from where it left off rather than starting over. This setup allows for seamless transitions between zones in the game without the music restarting from the beginning. You can leave the other options as they are.
- 4. Apply the same configuration to the second track by clicking the cell in the second column and first row. Always be sure to enable the Use Transition checkbox for every new transition setup.
- 5. Next, set up transitions from the main tracks to the win and lose cues. Click on the cell that transitions from "Track 1" to "Win" (first column, third row).
- 6. Since we typically want to provide feedback promptly, choose Next Beat for the Transition From field.
- 7. To ensure the Win track starts from the beginning each time, select Clip Start for the Transition To field. Leave the other options unchanged.
- 8. Apply the same configuration to the remaining transitions: from "Track 1" to "Lose" (first column, fourth row), from "Track 2" to "Win" (second column, third row), and from "Track 2" to "Lose" (second column, fourth row).
You'll end up with a table looking like this:
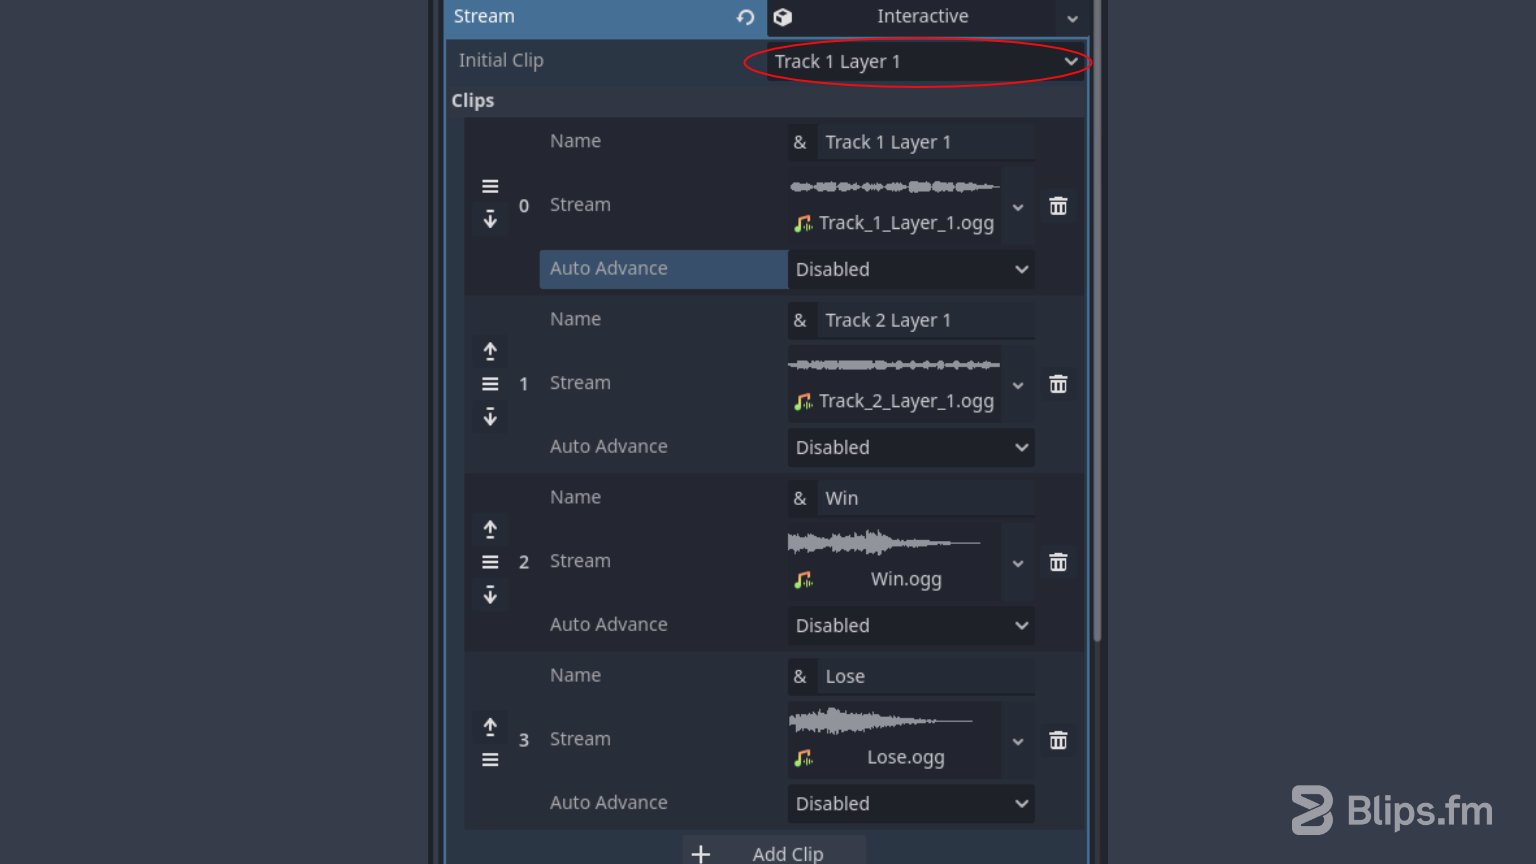
To finish the configuration, click OK. You can now preview the music system by checking the Playing checkbox. Playback will start with the clip set in the Initial Clip option field, which is located just above the clips section containing the music tracks.
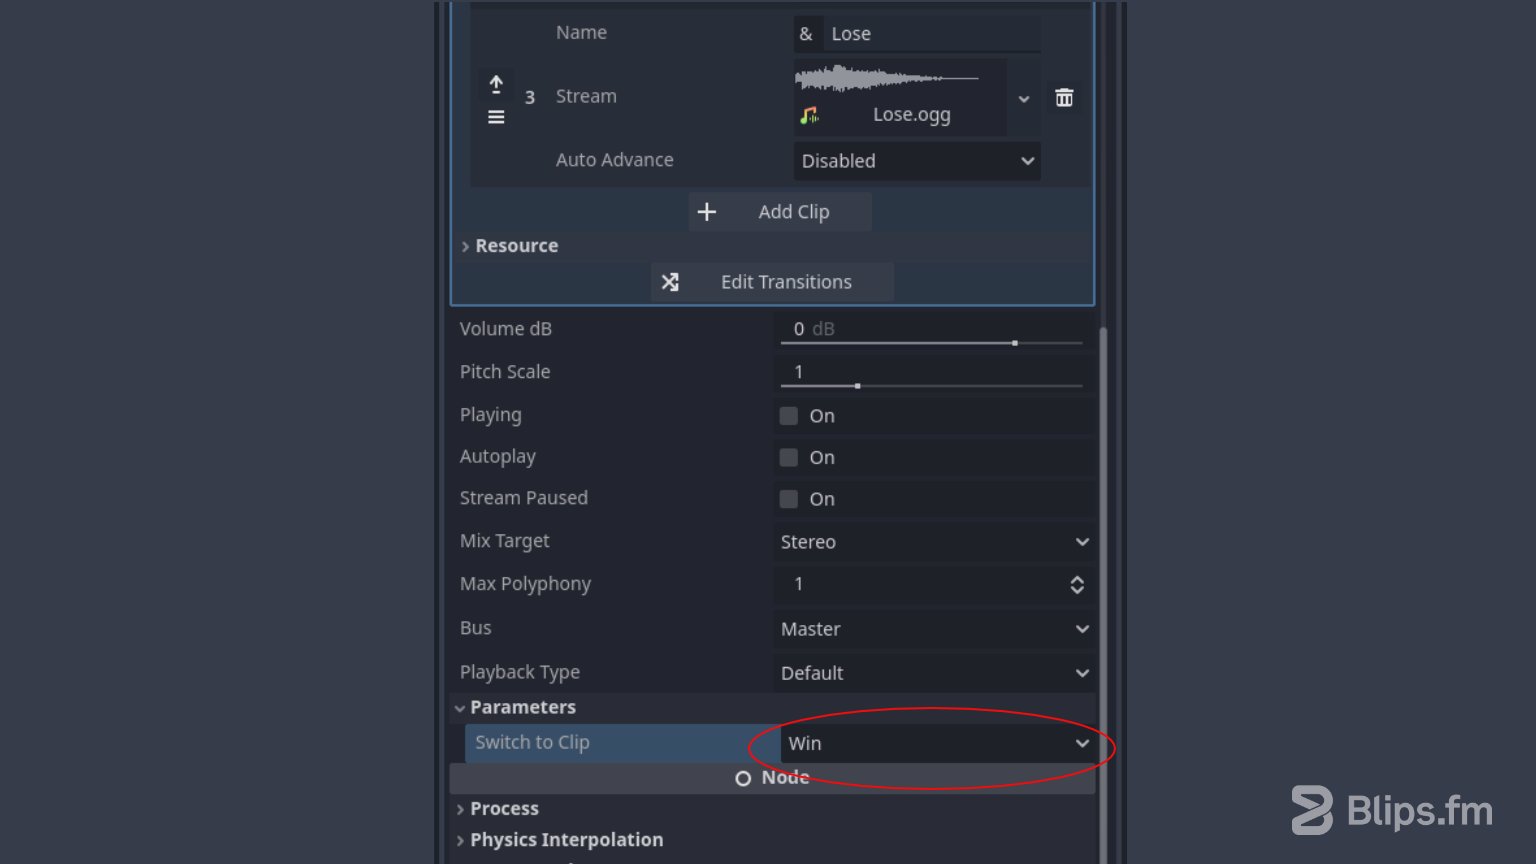
Notice that with this stream type, there's a handy Switch to Clip selection box that lets you quickly change between tracks and easily preview how the transitions sound. You can find this option by expanding the Parameters section in the Inspector.
I've noticed that sometimes configurations are not immediately applied, which may leave some tracks missing from this field. If this happens, try selecting another node in the scene and then come back to try the Switch to Clip box again.
Transitions from the Win and Lose tracks were not set up in this example for simplicity. However, the default behavior should work well for this use case. This also gives you an opportunity to experiment with different configurations and hear the results for yourself.
Finally, let's cover the remaining options in the Transition Editor window.
The Transition From field includes four options. We've already discussed Next Bar and Next Beat, but here's what the others do:
- Immediate: As the name suggests, this option causes an immediate transition without waiting for any musical subdivision.
- Clip End: The transition happens as soon as the current track reaches its end.
In the Transition To field, the remaining option is Same Position. This option allows the playhead position of the current track to be "transferred" to the destination track. This means the destination track will start playing at the same position (minute:seconds) where the previous track left off. This can be useful when both clips present the same length and the music should fade between them.
One option we haven't covered yet is Fade Mode. This option controls how volume fades are handled during transitions. In the previous example, we left it set to Automatic, which is recommended by the Godot documentation. This mode automatically applies fade logic based on the transition type. However, there might be situations where you need manual control over the fading process. Here's what the other modes do:
- Disabled: No fades are used for the transition. This is useful when transitioning from the end of one clip to the beginning of another, and each clip has its own start and end.
- Fade-In: Apply a fade-in effect to the next clip while letting the current clip finish.
- Fade-Out: Apply a fade-out effect to the current clip, and the next clip will start on its own.
- Cross-Fade: Apply a cross-fade effect between the clips.
In the Fade Beats field, you can specify the duration of the fade in beats. The value can be an integer or a decimal.
The Filler Clip allows you to specify an additional track to play during the transition between the origin and destination tracks. This feature is useful for adding "stingers" — short musical phrases that punctuate transitions, such as marking the end of a scene or signaling a dramatic shift.
Finally, there is the Hold Previous checkbox, which works with the Auto Advance option. You can find Auto Advance right below the waveforms and track names in the Inspector.
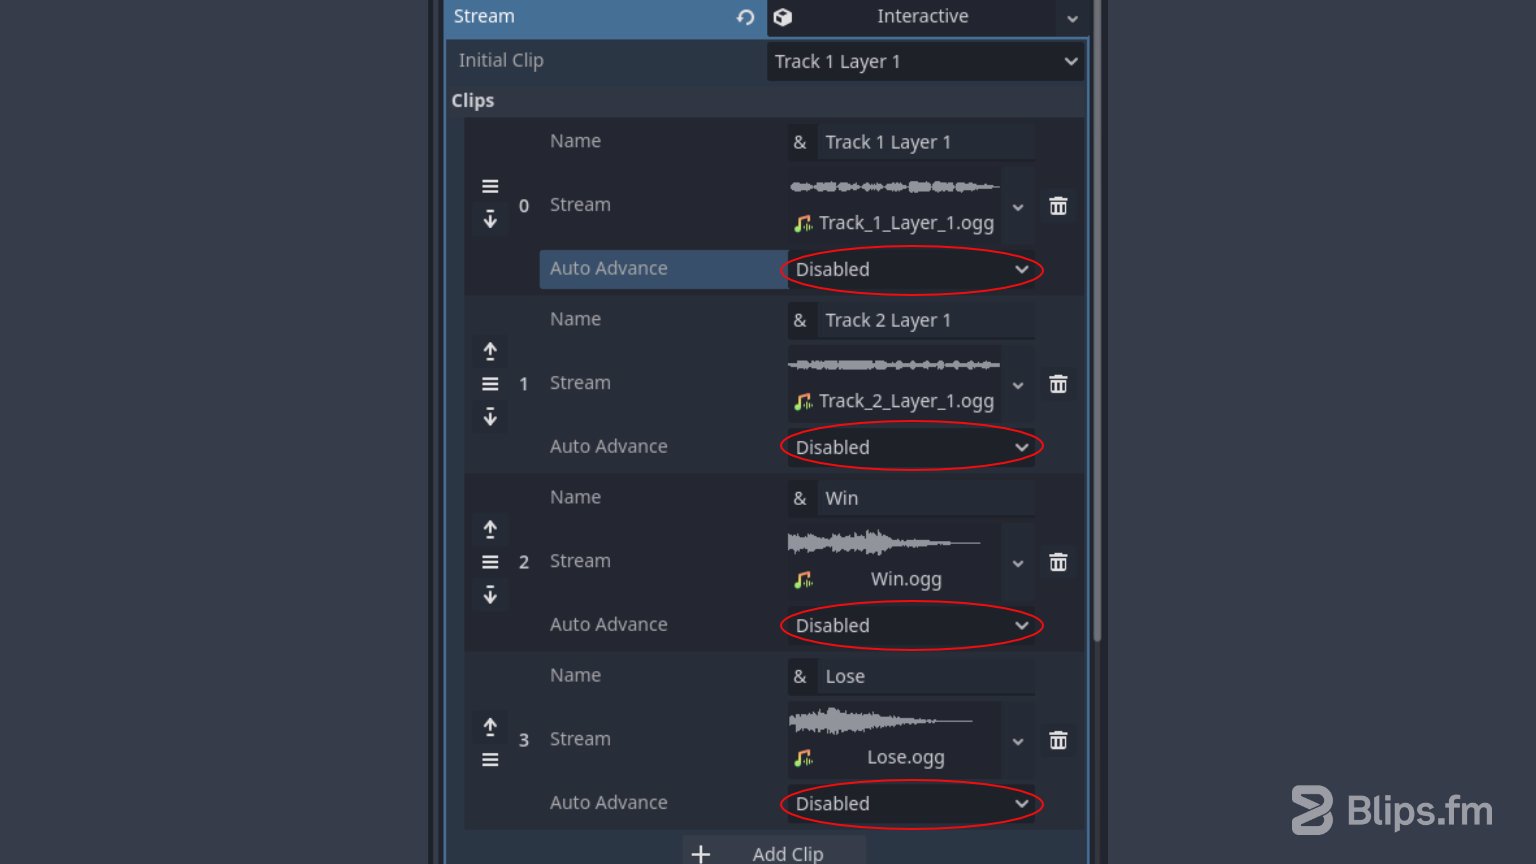
The Auto Advance option allows you to jump to another track as soon as the current one finishes. When you enable this option, you'll be prompted to select the track to jump to. If you choose Return to Hold instead, it will return to the previously playing track after finishing, but only if Hold Previous was selected in the Transition Editor.
Note: Unfortunately, there seems to be a bug with the Auto Advance option. Despite multiple attempts, I couldn't achieve consistent transitions, whether trying to jump to a specified track or using the Hold Previous option. This isn't a showstopper, but I hope this problem gets fixed soon.
Conclusion
As explored, Godot now includes powerful new features for designing intricate music systems. Although this new functionality still has room for improvement and may not yet replace the need for audio middleware solutions in larger projects, it is nonetheless a great addition. The fact that Godot is the first engine I'm aware of to include this kind of functionality is commendable. These new features, along with high-quality adaptive music, will help you as a developer deliver more immersive experiences for players without needing to rely on additional complex external tools.
How are you using the new music functionality? Do you have any questions or thoughts to share? Let us know in the comments below!